|
Contact the seller in advance before paying for the order! Make Your Own Wire Clasp In Just 5 Minutes
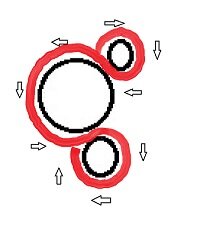
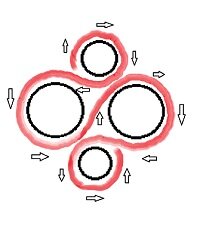
A wire clasp comes to rescue: All you need is a bit of wire, a hammer and an anvil. You don't need a wire-jig, but if you have one, the shaping of the soft curves of these clasps is like a warm breeze. You can however use a pencil, a mandrel, a pen or whatever you like and get the same result. The wire you use can be of any gauges, depending on whether you want a solid look or a slender one. Thicker wires are a bit harder to bend, but they give a real nice result. Since a clasp must be as solid and safe as possible, the wire should be half hard. A soft wire may be distorted when stress is applied, but a half hard will hold it's shape. If you additionally hammer parts of the clasp flat, you toughen the wire even more, making it a very safe wire clasp. I have used a soft wire in this tutorial, simply because it is blue and therefor easier for you to see on the photos. So, are you ready to give it a go? What you need is: Hook and eye clasp:  Step 2:  Step 3: 
Step 4: 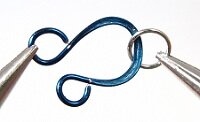
This is actually a very safe clasp, even for bracelets. It takes a lot of slack to make it open accidentally, and even then, it stays in place because of the loop you put through the eye. It does of course depend on the size of the jump ring, but if you use one that only just about slides over the loop, it is very safe. To fasten it to a necklace/bracelet, use a small jump ring and fasten it to the largest of the loops and then to the jewelry. 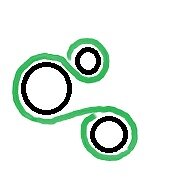
You can make variations of this wire clasp by putting one of the pegs further away from the large peg. If you don't have a wire jig, make the small loops with your round nose-pliers, and bend the wire around a pencil or mandrel to make the large curve.
Step 1:  Step2:  Step 3: Step 4: 
The two curves in the clasp makes it almost impossible for it to open accidentally. It is suitable for both necklaces and bracelets, and gives you a very safe wire clasp. You can see this type of clasp used in this tutorial. So next time you don't have a clasp, you know how to make a safe wire clasp for your lovely jewelry, and it only takes 5 minutes.
You can se variations of the hook and eye clasp in these tutorials: Use Links To Build An Elegant Charm Bracelet And Earrings How You Can Make A Double Hook Clasp Hook And Eye Clasp - A Simple Clasp With Lots Of Potential How to fasten a clasp to a beading wire Return from Make Your Own Wire Clasp In 5 Minutes to Jewelry Tutorials Contribute with YOUR tutorialMy dream is to make this site the largest and best jewelry making site there is. Where you can find tutorials on every aspect of jewelry making, a real tutorial heaven for crafters around the world. |