Store
The Basics
Tutorials
Read about
Other Stuff
|
Online sales are temporarily suspended !!
Contact the seller in advance before paying for the order!
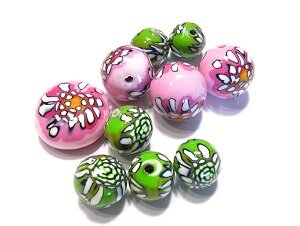
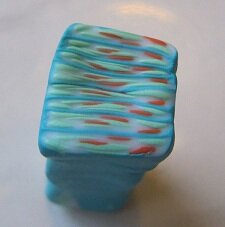
Color Full Flower Beads

Playing with clay is fun. This time I wanted to make some flower beads, but that was all I knew. It never cease to amaze me how clay takes over and create something out of itself as if I wasn't even there. This was one of those occasions. I made some canes and started playing with them, and these flower beads are the result.
Having nothing else than the colors and a vague idea of some flowery stuff in my head, I am pretty pleased with the result. I also (naturally, since I was messing around) had quite a bit of scrap clay left. You can see at the end of the tutorials how I used it. Okay, get your pasta machine ready, and let's start making flower beads!
What you need to make the Flower beads:
- Fimo Soft – Turquoise, Apple green, Mandarin, Christmas red, sunflower, White, Translucent
- Tissue blade soft
- Tissue blade firm
- Bamboo rods
- silver leaf
Step one:
Condition the clay and then make the following mixes:
- A: 12 parts white + 1/8 part Apple green + 2/8 part Turquoise
- B: 2 parts Mandarin + 1 part White + 3/8 Sunflower + 1/8 Christmas red
- C: 2 parts White + 1/2 part Turquoise + 1/8 part Apple green
 |
 |
Step 2:
Make a Skinner blend with white and color B. Roll it into a log from white to orange, and put it aside. |
Step 3:
Condition some translucent clay. Apply silver leaf and roll it up into a log. Put it aside. |
 |
|
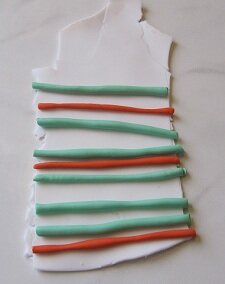
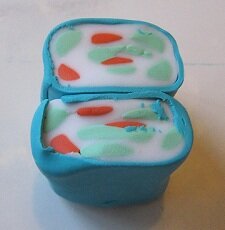
Step 4:
Condition some more translucent clay. Roll some of color C and color B into thin snakes, and put them onto the translucent sheet. Roll the sheet into a log. Run some Turquoise clay through on the thinnest setting on your pasta machine and wrap the log in it. Put it aside. |
|
 |
 |
Flower cane 1:
Cut the log you made in step four in two halves. Put one aside and cut the remaining one in two. Stack them and reduce the cane to half size. Cut it in two halves, stack them and reduce the cane again. Repeat two more times, and reduce the cane to the size of your little finger. If it is very soft from the handling, put it in the fridge while you make the other canes. |
|
 |
 |
Flower cane 2:
Cut the skinner blend cane from step one in two halves. Put one aside. Cut the remaining one in two and stack like you did in the first flower cane. Cut, stack and reduce it 6 times. Put it in the fridge while you make the third flower cane. |
Flower cane 3:
Take the remaining canes. Cut the skinner blend cane in two. Sandwich the cane from step four between the skinner blend canes. Reduce and cut it in two, stack and reduce again. Repeat two more times. Put it in the fridge. |
 |
|
Making the flower beads:
Step one:
Roll mix A into a log about 1 cm thick. Use a ruler and mark every cm. Cut and roll each piece into a round bead.
 |
 |
Step 2:
To shape the canes into petal shape, pinch along one side. They will distort when you cut them, but you can pull and pinch them back into shape before you apply them to the beads. The colder and firmer the clay is, the easier it will be to slice thin, nice slices. With Fimo Soft this is a problem sometimes, as it gets too soft to hold shape, even after some time in the fridge. Cutting the canes in two, and putting one half in the fridge, while working the other, can help. When the one you work with gets too soft, swap them. |
Cut thin slices from the canes you have made. Don't worry if they get too thin and fray a bit, that will only make the flowers look fluffy. Each cane is only one petal, so you need to put several slices together into a flower on your beads. Vary the flower canes from bead to bead. Add thin slices from the silver cane under and over the flowers. Try to cut as thin as you can, that way you will see only the silver lines when the bead is cured. |
 |
 |
| Roll the flower beads smooth on the work surface between each layer you add. If you want different sizes on the petals, reduce parts of the canes. When satisfied, pierce them on a bamboo rod and bake them for 30 minutes. |
Step 3:
When the flower beads are cold, give them the surface finish you prefer. I have glazed mine with liquid polymer clay to make them shiny and glass like. |
 |
|
See the flower beads used in a necklace in this tutorial
Return from Color Full Flower Beads to Polymer Clay Tutorials
Go to Home Page
Contribute with YOUR tutorial
My dream is to make this site the largest and best jewelry making site there is. Where you can find tutorials on every aspect of jewelry making, a real tutorial heaven for crafters around the world.
But, I need your help. Adding only my own tutorials will not give my visitors what they seek, so YOUR tutorial is very valuable not only for me, but for all the people visting this site. With your help, I may achieve my dream, to make this a true tutorial heaven.
|
|
|