Store
The Basics
Tutorials
Read about
Other Stuff
|
Online sales are temporarily suspended !!
Contact the seller in advance before paying for the order!
Funky Mica Shift Beads - Part 1

Sometimes it is fun to make something different, like these funky mica shift beads. Not the usual round beads, but something that looks odd, but nice at the same time.
And with polymer clay, you can shape anything your heart desires. The only thing to keep in mind when making beads like these, is that they have to be functioning in a design. But, don't worry about that right now, now is the time to go creative and have fun. So are you ready? OK!
What you need to make these mica shift beads:
- Fimo soft: Sunflower and Black
- Fimo Effect : Pearl and Copper
- Cernit: Olive and Bordeaux
- Pasta machine
- Tissue blades, firm and soft
- Crafts knife
- Round shape cutter
- The top of a pen (for small round shapes)
- Thin mandrels
- Texture plates, 3 different patterns (you can also use rubber stamps)
- Acrylic roller
Step 1:
Condition the clays well. The effect clays take a little longer to condition than the other two clays.
Step 2:
Make the clay mixes.
- A: 5 parts Bordeaux + 2 parts Sunflower
- B: 3 parts Olive + 3 parts Pearl
- C: 5 parts Pearl + 1 part Sunflower + a tiny, tiny bit of black. The black will gray the yellow pearl mix down a bit, and give you a beautiful lime colored mica shift sheet, like the inside of a lime. Be careful though, you only need a very, very small bit of black. Too much and it will become dirty.
|
 |
Step 3:
Make a Carrot Skinner blend with Copper, Sunflower and Olive. Put a pack of clay on top of the pasta machine to prevent the strip of skinner blend to widen. You want one long strip. When nicely blended, run it through on the thinnest setting and put it aside. |
 |
Step 4:
Dust the lime colored mica shift sheet with cornstarch or water. Use one of the texture plates to imprint the pattern on the sheet. |
 |
Step 5:
Use the softest of the tissue blades to shave of the raised parts of the pattern. Work in the same direction so that you don't ruin the mica shift. When done, smooth the surface by putting a piece of paper on top, and very carefully roll the acrylic roller over it. Do the same with the copper sheet and the green pearl sheet. Put them aside. You are now ready to start the beads. |
Lime colored mica shift bead:
 |
Step 1:
Roll some black clay into a ball and cut it in two to make a cabochon shape. Flatten it a little bit, and shape it into a nicely shaped dome. |
 |
Step 2:
Put the lime colored mica shift sheet on top of the cabochon, and carefully press it around it. Use the crafts knife to cut of the excess clay. Turn it upside down and trim the back side, and press the sheet tighter onto the cab. Roll a piece of black through on the thinnest setting. Put the cab on top of it, and cut around the edge. Press it firmly onto the cab. |
 |
Step 3:
Use a small round shape cutter to make several black discs. Apply them around the base of the cabochon. |
 |
Step 4:
Use the top of the pen, or another small object and make small round discs. Apply them in the middle of the black discs from step 8. Do not flatten them, but leave them as they are. |
 |
Step 5:
Use the mandrel to make a hole horizontally through the top of the cab. Put it on a piece of paper for curing. |
Leach bead 1:
Step 1:
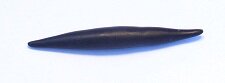
Roll some black clay into a bead shaped like a leach or cigar, making the tips thin and pointy. You do this by rolling it into an oval shape first, and then work each side. Use your hands, and the work surface. Pinch it into a nice even shape. |
 |
Step 2:
Use the craft knife and cut a free form shape from the Skinner blend sheet. |
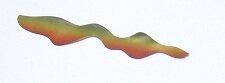 |
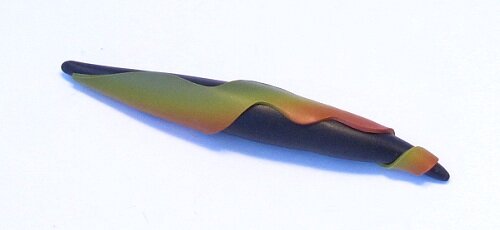
Step 3:
Apply it onto the leach shaped bead. If it is long, wrap it around the bead, for effect. If you are not content with the result, cut a new shape and try again. Use the mandrel to make a hole horizontally at the top of the bead. Put it next to the lime bead for curing. |
 |
Leach bead 2:
Step 1:
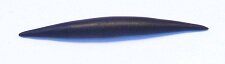
Make another leach bead, but a little smaller than the one you just made. |
 |
Step 2:
Cut a free form shape from the copper sheet. |
 |
Step 3:
Apply it onto the bead. |
 |
Step 4:
With the smallest shape cutter, make several small disks and place them randomly around the copper sheet. Make a hole horizontally at the top of the bead, and put it on the paper sheet for curing. |
 |
Go to Funky Mica Shift Beads Part 2
See These Beads Used In A Necklace
Return to Polymer Clay Tutorialsa
Go to Home Page
Contribute with YOUR tutorial
My dream is to make this site the largest and best jewelry making site there is. Where you can find tutorials on every aspect of jewelry making, a real tutorial heaven for crafters around the world.
But, I need your help. Adding only my own tutorials will not give my visitors what they seek, so YOUR tutorial is very valuable not only for me, but for all the people visting this site. With your help, I may achieve my dream, to make this a true tutorial heaven.
|
|
|
