|
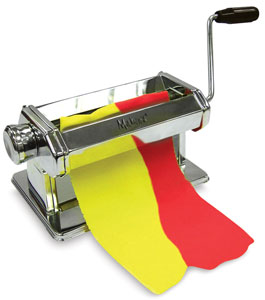
Contact the seller in advance before paying for the order! Skinner BlendThe Skinner blend was introduced to the polymer clay community by Judith Skinner. She introduced a new technique that blends two or more colors smoothly and seamless, using a pasta machine.
There are several ways to make a Skinner blend. You can blend two or multiple colors. The way the colors blend, depends on how you cut your sheets prior to running them through the pasta machine. You can be very accurate and measure exactly each sheet you put together, or you can be a little more casual about it, as the following tutorials will show you. When you run a Skinner blend sheet through your pasta machine, it will crawl wider horizontally as you go. You may then have to trim the sides a little. To get ragged edges is normal, also to get a curve on the top. Just trim it away when done. Are you ready to begin? OK! Condition 3 or 4 colors of clay. For these two blends I have chosen Plum and Raspberry for the continuous blend and Plum and Sunflower for the graduated blend. Put the Plum and Raspberry sheets on top of each other and cut them in two diagonally corner to corner. Stack the Plum colored triangles on top of each other, and do the same with the Raspberry ones, so that you have one triangle of each color. Put the triangles together so they form a square. Do the same with the Plum and Sunflower sheets, but cut them diagonally about 1 cm from the corners top and bottom. Stack and put the triangles together. You will now have two sheets looking like this:
Step 2:  Make sure you feed the sheet like shown in the picture. Without turning the sheet, fold it in two, and feed the folded side into the pasta machine and run it through. Keep on folding and feeding through the machine until you see the colors beginning to blend. Do the same with the other sheet. They will now look something like this:
Keep running them through until you have a nice even blend of the two colors. You will now see the difference between the graduated blend and the continuous blend.
Three color Skinner blend: Cut the peppermint sheet into a triangle that is about 1,5 cm at the top. Put the sheet on top of the Plum sheet, and cut one side of the plum sheet along the edge of the peppermint sheet. Do the same with the Sunflower sheet and put the three pieces together as shown.
Run the sheet through your pasta machine on the thickest setting, and continue folding and feeding as mentioned earlier. On the first picture you see the streaks of the mixed colors before they are fully blended. On the second, you see it finished.  Carrot Skinner blend: Put the carrots next to each other so that they lay thick end, thin end, thick end as shown.
Feed them into the pasta machine and run them through on the thickest setting. Fold and feed as described earlier. You will get a longer sheet than with the two previous techniques.
Return from Skinner blend to Polymer Clay Tutorials Contribute with YOUR tutorialMy dream is to make this site the largest and best jewelry making site there is. Where you can find tutorials on every aspect of jewelry making, a real tutorial heaven for crafters around the world. |


 There are many abbreviations of these four ways of making Skinner blends, and maybe you will invent your own. Experiment with multicolored sheets, colors you normally wouldn't put together and have tons of fun.