Store
The Basics
Tutorials
Read about
Other Stuff
|
Online sales are temporarily suspended !!
Contact the seller in advance before paying for the order!
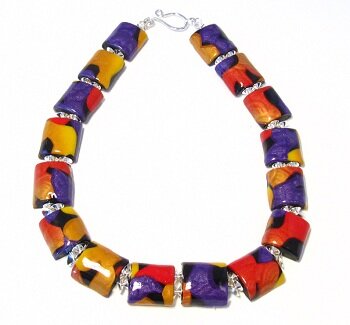
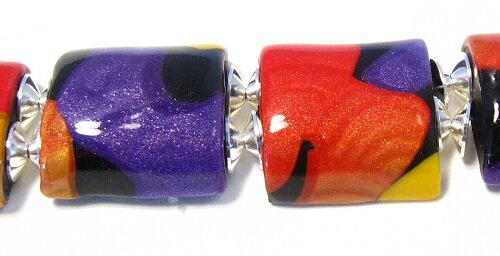
Radiant Mica Shift Necklace

This mica shift necklace is made with strong radiant complementary and analogous colors, making it colorful, vibrant and warm. The mica effect is not so strong, but still gives it an optical illusion of being 3 dimensional. To shape the beads I have used a bead roller. Not to roll the beads, but as a mold, making the beads square and beautifully domed. They are easy to make, so get your tools and let's start.
What you need to make this mica shift necklace:
- Fimo soft: Plum, Sunflower, X-mast red and black
- Fimo Effect : Gold and Pearl
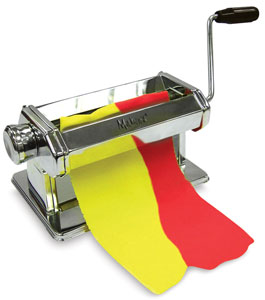
- Pasta Machine
- Acryllic roller
- Tissue blades, one soft and one firm
- Bead roller
- Bamboo rods or thin skewers or mandrels
- Heat gun
- Liquid polymer clay
- 4 5 mm silver plated round beads
- prox.70 silver colored bead caps
- Beading wire 49 strands
- 4 crimp beads
- 4 wire guardians
- Clasp
- Chain nose pliers
- wire cutters
Step 1:
Condition the clays well. The effect clays may take a bit more conditioning than the Fimo soft.
Step 2:
Make the colors.
- 4 parts Plum + 2 parts Pearl
- 4 parts x-mast red + 2 parts pearl
 |
Step 3:
Make two carrot Skinner blends.
- Sunflower and gold
- The red mix from step 2 and gold.
Run all the colors through a medium setting on your pasta machine. If it has 7 thicknesses, use number 4. If you have three, use number 2.
|
 |
Step 4:
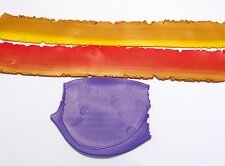
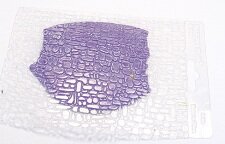
Dust the plum colored sheet with cornstarch or water. Put a texture plate on top and roll over it with your acrylic roller to imprint the clay evenly. Do the same with the two Skinner blend strips, but choose a different texture plate for each. |
 |
Step 5:
With the softest tissue blade, carefully shave off the top parts of the printed sheets. Make sure you shave in the same direction to make the mica shift effect. When done, put a piece of paper on top, and roll over it with the acrylic roller, to smooth the surface. Put the sheets aside. |
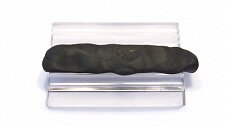 |
Step 6:
Roll some of the black clay into a log. Press it into the oval grove in the bead roller . Cut off excess clay on the top and the sides. Remove it from the bead roller, and put it aside. Make 5 more strips. |
 |
Step 7:
Run some black clay through the pasta machine on the thickest setting. Put two mandrels on it. They are going to be the holes in the beads, so do not put them to wide apart. Measure with one of the molded strips if necessary. Roll over the mandrels with the acrylic roller to imbed them well into the clay sheet. |
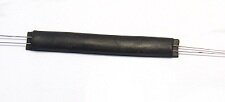 |
Step 8:
Put one of the molded strips on top of the clay sheet. Cut along the edges with the firm tissue blade. Put it aside. |
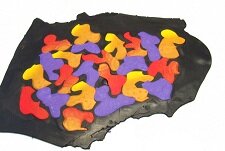 |
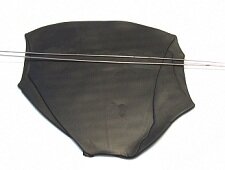
Step 9:
Make another black clay sheet, but this time run it through on the thinnest setting. Cut different shapes from the three mica shift sheets and apply them onto the black sheet. Leave some black space around them for effect. You can use shape cutters or use a crafts knife to cut random shapes, like I have done here.
When done, put a piece of paper on top of the sheet and even the surface with your acrylic roller. This will distort the shapes a little, especially if they are a bit thick, so you may want to make room for that when you apply the shapes.
|
 |
Step 10:
Cut a strip from the patterned sheet that is a little wider than the molded strips. Put the sheet on top of the strip you prepared in step 8. Try to remove air pockets. Press the sheet firmly around the strips top and sides. |
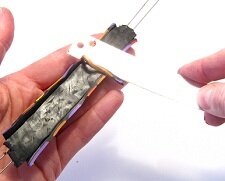 |
Step 11:
Carefully remove the mandrels, so you do not misshape the strip. Measure the width of the strip, and cut of slices that is of same length as the strip is wide. This will give you square beads. Redo the holes with the mandrel. Do that from both sides, so that you don't pull clay back into the holes. Put the beads on a piece of paper for curing. Repeat with the other 4 strips. Each strip will give you 4-5 beads, depending on your bead roller. So 5 strips will give you proximately 20 beads. If you want to make something longer or shorter, add or subtract number of strips. |
|
Step 12:
Cure the beads for 30 minutes and let them cool off. |
|
Step 13:
When cold, sand the back of the beads, so they are nice and even. |
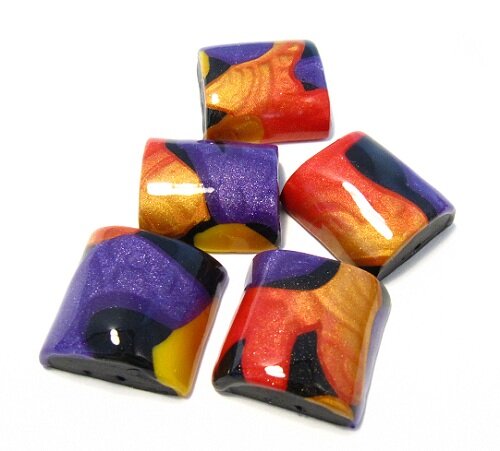 |
Step 14:
Glaze the beads with liquid polymer clay, or give them the surface finish you prefer. You should now see the mica shift effect clearly. Your beads are now ready to be strung. |
 |
Step 15:
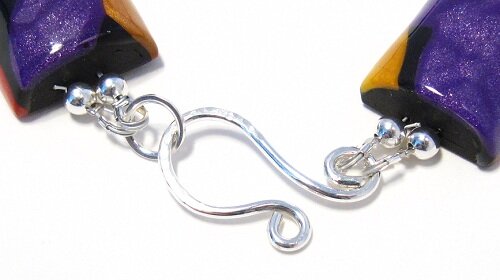
Cut two lengths of beading wire, proximately 50 cm. Attach both wires to the ring end with wire guardians and crimps. String on one 5 mm silver plated bead and one bead cap on each of the wires. Add one the mica shift bead and then two bead caps to each wire. Repeat until you reach the desired length, but remember that you have to add the clasp to the total length. When the last bead is strung, add one bead cap and one silver plated bead to each wire, and attach the wires to the clasp with crimps and wire guardians. Do not pull the wires too tight, that will only make the necklace stiff and not flexible. Trim the wire ends, and your mica shift necklace is done. |
 |
 |
Return from Radiant Mica Shift Necklace to Polymer Clay Tutorials
Go to Home Page
Contribute with YOUR tutorial
My dream is to make this site the largest and best jewelry making site there is. Where you can find tutorials on every aspect of jewelry making, a real tutorial heaven for crafters around the world.
But, I need your help. Adding only my own tutorials will not give my visitors what they seek, so YOUR tutorial is very valuable not only for me, but for all the people visting this site. With your help, I may achieve my dream, to make this a true tutorial heaven.
|
|
|