|
Contact the seller in advance before paying for the order! Chain Mail – Useful Information To Avoid Frustration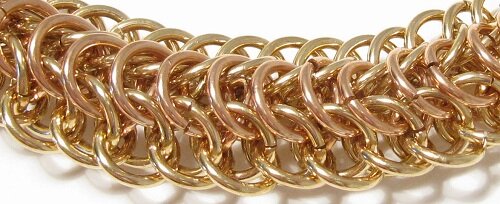
Chain mail is an amazing jewelry technique. The mere fact that you can create stunning and complex jewelry simply by joining jump rings together without any soldering makes it a very popular technique among jewelry makers.
It is also one of the few techniques that require very little tools and space. All you need are the jump rings and a pair of chain nose pliers, which make it a hobby you can easily bring with you everywhere. Before you throw yourself into the wonderful world of chain mail, there are some basics that may be of great help to you. It can be very frustrating if you begin a project only to find out that the rings doesn’t fit into each other, or that it becomes some loose wobbly thing that looks nothing like the pattern you wanted to make. Chain mail patterns are all logical, someone have figured out how to make them, what size of rings to use and how to join the rings as effortless as possible. If the weave gets very loose or very rigid, there is probably something wrong with either how you have done the weave or with the size of the rings. Therefore read the following thoroughly before you begin. It may save you a lot of frustration. Aspect ratio (AR):
In order to know what size of rings you can use to make a certain pattern, the aspect ratio (AR) is very important. The AR makes sure that all the rings will fit into each other, regardless of how thick or thin you want your jewelry to be. If you use rings that do not match the same AR as the pattern is made for, you will not be able to fit all the rings into each other, or it will be too rigid or too loose. The formula for calculating the AR is: AR = Inner diameter of the ring (ID): Wire diameter (WD) This means that if you have rings with and ID of 6 mm and use a 1.2 mm wire, the AR for that pattern is 5. If you want to use the same pattern, but with smaller and thinner rings like WD 0,8 mm (20 gauge), you can use the AR to figure out the size of the rings you need by using the formula like this: ID = WD x AR So you can make the same pattern only smaller by using 0,8 mm wire and rings with an ID of 4. Calculating like this, you can make chain mail jewelry in all sizes and with different wire diameters/wire gauge and size of the rings. You can make a pattern with a higher AR than recommended, but not with a lower one. If it is lower the rings will not fit into each other or it will be stiff and not flexible enough. There is no upper limit, but if you go too high, the weave will be very loose and the rings will flop around. Wire gauge: For instance a 20 gauge wire is in the AWG system 0.8128 mm while it in the SWG is 0.9144 mm. So multiplying or dividing with each of the two, will give you a different AR or ID.
The ring sizes (ID) are often written in inches, which may be a bit confusing if you come from a country that measures in millimeters, like I do. The chart below will make this easier for you. If a pattern requires for instance 3/8” – 14 SWG it means that you need a ring with ID of 9.525 mm (3/8”) made from 14 gauge wire measured with the SWG system which is 2.0320 mm.
About the rings:
You can choose between machine cut and saw cut rings. Machine cut rings are less expensive than saw cut rings. Saw cut rings are also cut by a machine but since they are cut with a rotary saw blade, the cutting is finer than the machine cut rings. They are therefore more suitable for fine jewelry. Both cuts are however good cuts for chain mail rings, and the difference is minor. You can make your own rings, which may be less expensive than purchasing commercially made rings, depending on the metal used. To make them you need mandrels to coil the wire around. You can get mandrels in all sizes. The diameter of the mandrel is the same as the ID of the ring. When you coil a wire you apply a certain tension to the wire. When you let go of the end of the wire, the coil will unwind a little bit. This is called spring back and means that the rings will be a little bit larger than the mandrels diameter. How much a wire springs back depends on the metal. The harder the metal is the more the wire will spring back. The temper of the wire also influence the spring back. A hard wire will spring back more than a half hard or soft wire. This applies to both self made and commercially made rings. The difference in size is not large enough to matter much, so the rings are measured by the diameter of the mandrel used instead of the actual diameter of the finished rings. If you don’t want to coil your own rings, but want to cut them yourselves, you can purchase coils from chain mail suppliers.
I would however not recommend you to use rings cut with a wire cutter for your chain mail projects. The cutters leave one end slanted, like you can see on the photo to the left, and the ring may not close properly. Making chain mail jewelry takes a lot of work, and losing a ring in between the weave may be disastrous and can ruin the whole work. Also, the tighter the cut edges fit, the nicer the overall appearance of the jewelry will be. Making your own rings takes time and can be hard on your hands, so consider if it really is worth the money saved, compared to purchasing commercially made rings. You do however have more freedom to make rings in different sizes and numbers as well as using the metal you prefer. The weaves:
Searching for patterns you often see some numbers after the family name of the weave, like European 4-1. This means that four rings goes through one ring. You have different versions of this weave called European 6-1, 8-1 and even 9-1. The more rings you fit into one ring, the tighter the weave will be. In the Japanese family, you may see numbers like 1-2 which means that one ring goes through 2 rings. Or 12-2, 6-4, 2-6 and 8-4. This can be a bit confusing sometimes, as not all patterns start with the right numbers of rings to go through a ring. The rest of the rings may be added at a later stage of the weave. This applies especially to hybrid weaves, but also to variations of all the weaves in the four families. I hope this was of help to you, and that you will create lots and lots of beautiful chain mail jewelry in the future. I wish you good luck! Here are some chain mail tutorials for you: Make A Full Persian 6-1 Pendant With Lovely Aqua Jasper Pebbles Blue Dragon Back Chain Mail Necklace Return from Chain Mail to Jewelry basics Leave a comment ,I would love to hear your opinion on this page. Good or bad, it will help me making this Site better. |
||||||||||||||||||||||||||||||||||||||||||||||||||||||||||||||||||||||||||||||||||||||||||||||||||||||||
 The best way to cut the rings is to use a hack saw or a rotary tool. It will give you a very clean cut which closes well.