Store
The Basics
Tutorials
Read about
Other Stuff
|
Online sales are temporarily suspended !!
Contact the seller in advance before paying for the order!
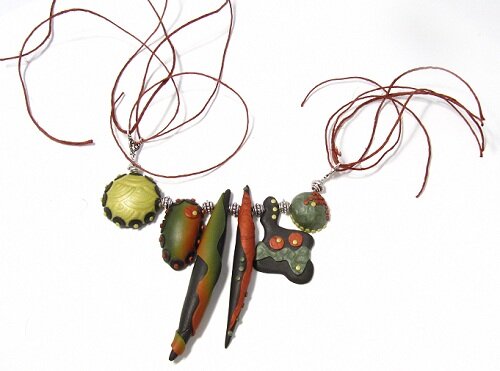
Funky Mica Shift Necklace

This mica shift necklace consist of six different shaped beads. Although the team for the necklace is mica shift, a technique made with clay that contains mica particles, a three color skinner blend is used as well.
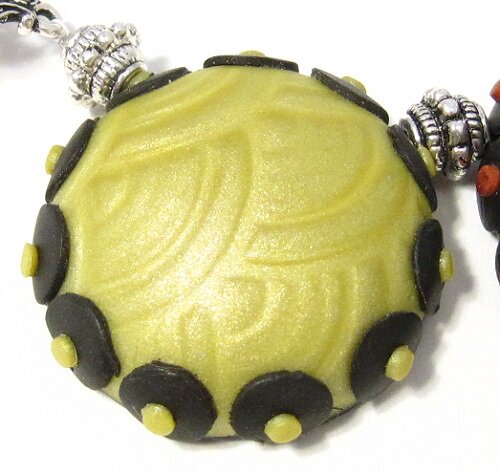
Held in lovely earth toned colors of moss green, copper and black, one lime colored bead is put in as an accent to balance the overall appearance of the necklace.
Using Effect clay with mica particles, you can create beautiful optical illusions of three dimensional patterns. The secret is to first stamp the clay and then shave the raised parts off with a tissue blade. Shaving in the same direction is crucial to have the mica particles align in the same direction, creating the pattern of light and dark clay.
The result is beautiful, and the beads looks as if they were 3 dimensional.
What you need to make this mica shift necklace:
- 6 polymer clay beads of different size, shape and coloration. You can see how these beads were made in this tutorials: Funky Mica shift Beads Part 1, and Funky Mica Shift Beads Part 2.
- 7 studded spacer beads
- Two metal links, for two or three strings
- Two metal cones
- One wire clasp
- One jump ring that fit over the loop of the clasp
- Hemp
- Crimp beads
- Wire guardians
- Beading wire, 49 strands
- Wire cutters
- Chain nose pliers
- Pair of scissors
Step 1:
Cut a length of beading wire. It must be long enough to fit all the polymer clay beads and spacer beads. Attach one of the links to one end with a crimp bead. String one spacer bead, one polymer clay bead, one spacer bead, until all the beads are strung on the wire. Add the second link to the end with a crimp bead. |
 |
Step 2:
Cut 6 lengths of hemp, proximately 35 cm. Thread the hemp lengths through the loops of the links. The links I used have only two loops, but have an opening in the middle, so I strung the third length on each side through that. To determine how long the hemp threads must be, hold the necklace against your neck, or go for a standard length. You must add the length of the cones and the clasp, and also have enough to make a knot on the end of the hemp lengths. |
 |
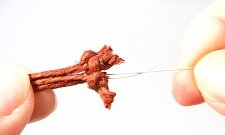
Step 3:
When you have determined the length, tie the hemp ends together. If the cones you have chosen are a bit narrow, make the middle length of hemp a few mm longer than the other two. In stead of having all three knots fitting the opening, you pull this in first, and the two other ones will fit the base of the cone. Trim the ends close to the knots. |
 |
Step 4:
Cut a length of beading wire, proximately 6 cm. Pass it through the loops of the hemp strings and secure it with a crimp bead. Pass the wire through the cone, and pull the knots into the cone. |
 |
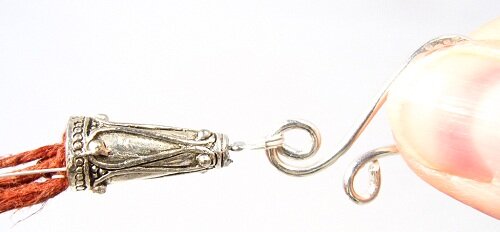
Step 5:
Add the clasp to the wire with a wire guardian and a crimp bead. Repeat step 4 on the other side of the necklace, but attach the jump ring.
And that was it. Your Funky mica shift necklace is ready to be worn.
|
 |
 |
 |
 |
 |
Retrun from Funky Mica shift Necklace to Jewerlry Tutorials
Go to Home Page
Contribute with YOUR tutorial
My dream is to make this site the largest and best jewelry making site there is. Where you can find tutorials on every aspect of jewelry making, a real tutorial heaven for crafters around the world.
But, I need your help. Adding only my own tutorials will not give my visitors what they seek, so YOUR tutorial is very valuable not only for me, but for all the people visting this site. With your help, I may achieve my dream, to make this a true tutorial heaven.
|
|
|
