Store
The Basics
Tutorials
Read about
Other Stuff
|
Online sales are temporarily suspended !!
Contact the seller in advance before paying for the order!
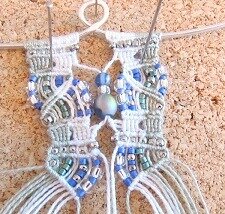
Macrame Bracelet – Do Magic With Double Half Hitches And Beads - Part One

This macrame bracelet is made with horizontal and vertical double half hitches. It never cease to amaze me how such simple knots can be used to create something as beautiful as macramè jewelry. By knotting the strings in various orders, you can make stunning and very intricate patterns.
On my quest to learn about macrame, I found sites with beautiful looking macramè jewelry, but not a single tutorial on how to make them.
There were of course tutorials on how to do the different knots, and lots and lots on how to make friendship bracelets, but none of the more complex looking ones.
I found this strange, but trying to make tutorials about my own macrame jewelry soon gave me the answer to why so few had done it before me: It is simply too complicated to explain step by step, as you may have to do side steps throughout the knotting to have it all match with beads and colors and the orders of the strings. You should think it would be easy to do first one half of the macrame bracelet and then just copy it and do the other side. But it simply wasn’t that easy.
Along the way, the macrame pattern changed the order of the colored strings, and suddenly I was stuck with strings of one color on the wrong side. To get back on the track, I had to do some minor side steps, which again caused problems further ahead. If you don’t have to explain to somebody how the macrame bracelet was made, these small sidesteps would never be noticed and disappear in the overall look of the jewelry. But when you use it in a tutorial and have to describe every step, it cannot be overlooked.
I will try to guide you through how I made this macrame bracelet, and also try to describe to you what I did wrong throughout its creation. I hope you still like it, and will use my glories and mistakes to inspire and help you on your way into the lovely world of macrame.
Knot bearer: This is the string that you use to tie the other strings/knots around.
Knotting cord: This is the cord you tie the knots with
What you need to make this macrame bracelet:
- DMC cotton perle crochet yarn in white and green. This is a very thin crochet yarn which is thin enough to pass through seed beads #11.
- Delicas #11 seed beads in blue (A) and green (B)
- Silver lined transparent seed beads #8 (C)
- Silver plated seed beads #11 (D)
- 4 mm round glass beads, frosted iris blue (E)
- 6 mm round glass beads, frosted iris blue (F)
- Square silver colored seed beads (G)
- Silver soft wire, 18 gauge
- Glue
- Round nose pliers
- Wire cutter
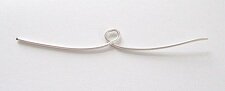 |
Step 1:
Before you start making the macrame bracelet, you need to make one part of the clasp. Cut a piece of silver wire, 12 cm long. Make a fairly large loop on the middle with your round nose pliers. It must be big enough for the hook part of the clasp to pass through it. |
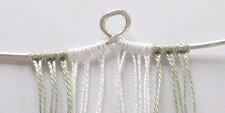 |
Step 2:
Cut 6 green cords, each 160 cm. Cut 6 white cords, each 160 cm.
Fold each cord in two and attach them to the wire with Larks head knots and one half hitch on each side of the Larks head knot. Keep all the whites in the middle with three green cords on each side. (That will give you green strings on each side).
Add glue to all the cord ends and let it dry. This will make it easier for you to string the beads. Each side of the clasps loop will be knotted separately, each with strings 1-12 going from left to right.
|
 |
Step 3:
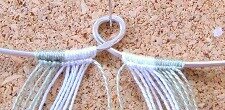
Pin the clasp wire onto a cork mat. This will make it easier for you to knot. Make one row of double half hitches (DHH), using string 1 as the knot bearer on the left side and string 12 as knot bearer on the right side. |
 |
Step 4:
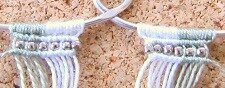
Add a silver plated #11 seed bead (d) to every other string, starting with string 12 on the left side and string 1 on the right side. Make one row DHH bringing the knot bearers back to where they came from. |
 |
Step 5:
Make one row of vertical double half hitches (VDHH) with the green strings using string 1 as the knot cord. Do the same with the white strings using the 7.string as knot cord.
Make another row of VDHH bringing the strings back to their previous position. Do the same on the right hand side, using the 12. string and the 7. string as knot cords. |
 |
Step 6:
Make one row of DHH. On the left side, use the 1th string as knot bearer. On the right side, use the 12th string as knot bearer. Do not make a knot with the 12th string on the left- and the 1st string on the right side. |
 |
Step 7:
On the left side: Use the 2nd string as knot bearer and make another row of DHH. Do not knot make a knot with the 1th string that you used in step 6, or the 12th. On the right side: Use the 11th string as knot bearer and leave out the 12th string and the 1st string. |
 |
Step 8:
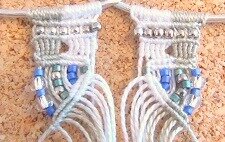
On the left side add beads like this:
- 1th string: one A, one C, one A, one C, one A.
- 4th string: one B, one D, one B, one D, one B.
- 6th string: three A.
- 9th string: one B.
On the right side:
- 12th string: one A, one C, one A, one C, one A.
- 9th string: one B, one D, one B, one D, one B.
- 6th string: three A.
- 3th string: one B.
Make one row with DHH using the 2nd string on the left and the 11th string on the right side as knot bearers. You will make this row diagonal following the increase of beads from center and out. Put the 1th and the 12th out of the way. You will not use them yet.
|
 |
Step 9:
Make another row with DHH bringing the 1st string on the left side and the 12th string on the right side back to their original places. |
 |
Step 10:
Left side: Add beads like this:
-
- 2nd string: one D
- 6th string: three B
- 9th string: one A, one D, one A, one D, one A.
- 11th string: one A, one C, one A, one C, one A
Use the 1th string as knot bearer and make two rows of DHH. They are made diagonal close to the beads.
Right side: Add beads like this:
-
- 12nd string: one D
- 9th string: three B
- 6th string: one A, one D, one A, one D, one A.
- 3rd string: one A, one C, one A, one C, one A
Use the 12th string as knot bearer and make two rows of DHH.
Add one E, one C and one F to the two center strings that you left out in step 8. (the 12th string on the left side and the 1st string on the right side.)
|
 |
Step 11:
Repeat step 5 and then step 4. |
 |
Step 12:
Left side: Add beads like this:
-
- 2nd string: one D
- 6th string: three B
- 9th string: one A, one D, one A, one D, one A.
- 11th string: one A, one C, one A, one C, one A
Use the 1st string as knot bearer and make DHH diagonal along the beads. Do not knot the 12th string.
Right side: Add beads like this:
-
- 12nd string: one D
- 9th string: three B
- 6th string: one A, one D, one A, one D, one A.
- 3rd string: one A, one C, one A, one C, one A
Use the 12th string as knot bearer and make DHH diagonal along the beads. Do not knot the 1st string.
|
 |
Step 13:
Left side:
Use the 2nd string as knot bearer and make a row of DHH. Do not knot the 1st string you used in step 12. Add beads like this:
-
- 3th string: one A, one C, one A, one C, one A.
- 6th string: one B, one D, one B, one D, one B.
- 9th string: three A.
- 11th string: one B.
Use the 2nd string as knot bearer and make a row of DHH along the beads. Then use the 1st string and do the same.
Right side: Add beads like this:
- 2th string: one A, one C, one A, one C, one A.
- 5th string: one B, one D, one B, one D, one B.
- 8th string: three A.
- 10th string: one B.
Use the 11th string as knot bearer and make a row of DHH along the beads. Then use the 12th string and do the same.
|
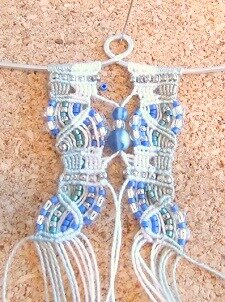
End of Part One.
Go to Macrame Bracelet Part Two
Return from Macrame Bracelet Part One to Jewelry tutorials
Go to Home Page
|
|
Hippie Hemp
Jewelry and polymer clay tutorial heaven

Promote Your Page Too

|