Store
The Basics
Tutorials
Read about
Other Stuff
|
Online sales are temporarily suspended !!
Contact the seller in advance before paying for the order!
Macrame Bracelet – Do Magic With Double Half Hitches And Beads – Part Two

Welcome to part two of the tutorial on this Macrame bracelet. If you have made it this far without too much frustration I believe you are ready for the rest of the tutorial on how to make this macrame bracelet. So, here it is:
 |
Step 14:
Left side: Add beads like this:
-
- 1st string: one A, one C, one A, one C, one A.
- 5th string: one B, one D, one B, one D, one B.
- 8th string: three A.
- 11th string: one B.
Use the 11th string as knot bearer and make one row of DHH along the beads. Then use the 10th string and do the same, but do not knot the 1st string.
Right side:
Add beads like this:
- 12th string: one A, one C, one A, one C, one A.
- 7th string: one B, one D, one B, one D, one B.
- 5th string: three A.
- 2th string: one B.
Use the 2nd string as knot bearer and make on e row of DHH along the beads. Then use the 3rd string and do the same, but do not knot the 12th string
|
 |
Step 15:
Left side:
Add beads like this:
-
- 1nd string: one D
- 3th string: three B
- 6th string: one A, one D, one A, one D, one A.
- 9th string: one A, one C, one A, one C, one A
Use the 10st string as knot bearer and make DHH diagonal along the beads. Then do the same with the 11th string.
Right side:
Add beads like this:
-
- 9th string: one D
- 7th string: three B
- 4th string: one A, one D, one A, one D, one A.
- 1rd string: one A, one C, one A, one C, one A
Use the 10th string as knot bearer and make DHH diagonal along the beads. Then do the same with the 11th string.
|
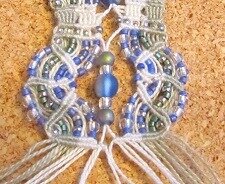 |
Step 16:
Add one E, one C, one F, one C and one E to the two center cords and knot them with the knotting cords you used in step 15. |
 |
Step 17:
Repeat step 4. Now, this is where I made the first mistake that I had to step around further down the macrame bracelet. On the left side, I used the 12th cord to make the first row of DHHs, and instead of using the same string back on the second row, I used the 11th, which left me with two white strings on the green side.
So don’t do that. Use the 12th for both rows of DHHs and the 1st on the right side to do the same. |
 |
Step 18:
Left side:
- 1nd string: one D
- 3th string: three B
- 6th string: one A, one D, one A, one D, one A.
- 9th string: one A, one C, one A, one C, one A
Use the 10st string as knot bearer and make DHH
Put the 12th aside like you did in the first rosette. (If you did bring the 12th string back like I said in step 17, you will use the 1st and 2nd cords as knot bearers in this step, and string beads on the 3rd, 6th, 8th and 11th strings)
Right side:
Add beads like this:
- 9th string: one D
- 7th string: three B
- 4th string: one A, one D, one A, one D, one A.
- 2nd string: one A, one C, one A, one C, one A
Use the 3rd string as knot bearer and make DHH diagonal along the beads. Then do the same with the 2nd string.
Put the 1st aside like you did in the first rosette. (If you used the 1st string for both rows of DHH, you will use the 12th and 11th strings as knot bearers and string beads on the 10th,8th, 5th and 2nd strings)
|
 |
Step 19:
Left side:
Add beads like this:br>
-
- 1st string: one A, one C, one A, one C, one A.
- 4th string: one B, one D, one B, one D, one B.
- 7th string: three A.
- 9th string: one B.
Use the 11th string as knot bearer and make one row of DHH along the beads. Then use the 10th string and do the same.
Right side:
Add beads like this:
- 12th string: one A, one C, one A, one C, one A.
- 9th string: one B, one D, one B, one D, one B.
- 6th string: three A.
- 4th string: one B.
Use the 2nd string as knot bearer and make one row of DHH along the beads. Then use the 3rd string and do the same.
Now you have the two white strings back on the green side. You are also on the wrong side to make the V shape with the beads. It needs to be started on the beginning of the V shape. You therefore need to make some correction to be on the right side with the right colored cords.
You do that by repeating step 17 knotting the two white cords back with two rows of DHH. (Unless you corrected it in step 17. If you did, use only the 1st string as knot bearer for both of the rows of DHHs)
|
 |
Step 20:
Repeat step 19, but without the row of silver plated beads. |
 |
Step 21:
Repeat step 18. |
 |
Step 22:
String the two center cords with one E, one G, one F, one G and one E. Knot the cords with the knot bearers from step 18. |
 |
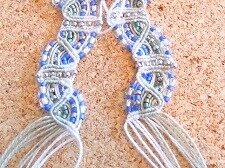
Step 23:
Repeat step 17, but remember to use only the 12th string on the left side and the 1st on the right side to keep the white cords on the center sides. (You see on the photo that I made the same mistake again as in step 17.)
Repeat steps 16 to 1 in reverse to finish the rest of the bracelet.
|
 |
Step 24:
Cut a piece of wire, 16 cm long. Use the round nose pliers to bend it on the middle. Measure 4 cm from the bent tip and bend the wire to the sides. Use a hammer and flatten the tip slightly. Use a pair of chain nose pliers to squeeze the ends together. Measure 2 cm from the tip and bend it towards the place where the ends go out to the sides. |
 |
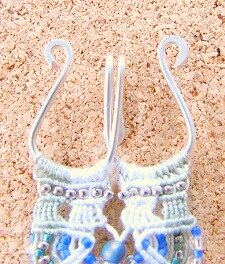
Step 5:
Put the clasp into the end of the macrame bracelet. Tie each string onto the clasp with double half hitches. When done, fold the strings down along the back side of the bracelet and add glue along the knots. When the glue is dry, cut off the strings close to the knots. |
 |
Step 26:
Measure the width of the macrame bracelet and bend the ends of the clasp upwards. Cut them in the same length and make a loop on the end. Hammer the ends flat. Repeat on the other half of the clasp. Bend the clasp slightly to have it curve around the wrist. Bending them will also make the clasp safer. |
 |
And that was it. I hope I have not confused you too much in this macrame tutorial, and that my descriptions are correct. It is so easy to forget small things through all the knotting. The main thing to remember is to try to keep the white and green separate the whole way. That basically means that if you have brought one over to the other side, you have to bring it back as well. If you leave it, you will lose the effect of using two colors. |
Return to Macrame Bracelet - Part 1
Return from Macrame bracelet - Part 2 to Jewelry Tutorials
Go to Home Page
Leave a comment ,
I would love to hear your opinion on this page. Good or bad, it will help me making this Site better.
|
|
|
