Store
The Basics
Tutorials
Read about
Other Stuff
|
Online sales are temporarily suspended !!
Contact the seller in advance before paying for the order!
Yellow And Purple Macrame Bracelet – Part 1

Having spent the summer practicing micro macrame, I finally have the guts to say that I am getting the hang of it. It has been a looooong way with piles of started and unfinished projects for the past 6 months, but it has all been worth the effort.
Macramè is very addictive, and I find it very mentally stimulating, as you have to think how you will put each knot and put each string, to get it right.
It also takes surprisingly little space, so you can do it where ever you are.
This micro macrame bracelet takes a while to make, but is all worth it. I chose complementary colors of violet and yellow as well as yellow and purple beads accented by gold. It is a long process to make this macrame bracelet, so I had to divide the tutorial into three parts. I hope you will enjoy making it like I did. So grab your cord and beads and let’s start your macrame bracelet.
What you need to make this macrame bracelet:
- Cotton cord in violet and yellow, I use DMC cotton cord.
- A: Seed beads #11 silver lined rainbow purple (Dynamites)
- B: Seed beads #11 silky luster peach (Delicas)
- C: Seed beads #11 silver line light peach (Delicas)
- D: Seed beads #11 light gold (Delicas)
- E: Seed beads #8 silver lined amethyst (Dynamites)
- F: Seed beads #8 transparent rainbow amber (Dynamites)
- G: Seed beads #6 rainbow transparent creamsoda (Dynamites)
- H: Seed beads #6 silk lined square hole rainbow light purple (Dyanmites)
- 6 Aragonite beads, square 8x4 mm
- 1 quarts scarab
- 4 Marcasit square beads
- Sterling silver wire, 16 gauge
- Round nose pliers
- Chain nose pliers
- Wire cutters
- Hammer
- Anvil
Some explanation:
Knot bearer: The string you tie all the knots onto.
Knotting cord: The string you use to make the knot onto the knot bearer.
Starting on the left side on both sides of the loop (the clasp), give the cords numbers (#)1-16. I will keep this order of the strings regardless of where I move a string to. This is to make it less confusing for you. So if I move string #1 to the end of the right hand side, its new position is as string #16. I do this through every move, so if I do several moves in one step, it automatically goes back to strings 1-16 when one move is done, not the whole step.
Step 1:
Cut 8 lengths of violet cord, each 160 cm
Cut 8 lengths of yellow cord, each 160 cm
Add glue to the last 1-2 cm of each end of the cords.
 |
Step 2:
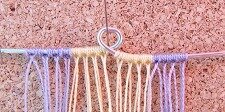
Cut a 12 cm long piece of the silver wire. Make a loop on the middle. Tie the cords onto the wire with Larks head knots and half hitches. Put all the yellow in the middle – 4 cord on each side of the loop, and then tie the violets on the outside of the yellow cords. This will give you 16 strings on each side of the loop. |
 |
Step 3:
Left side: Use string #1 as knot bearer and make one row of double half hitches (DHH)
Right side: Use string #16 as knot bearer and make one row of DHH.
|
 |
Step 4:
Left side: Add one D on every other string, starting with string #2, and do one row of DHH with string #16 as knot bearer
Right side: Add one D on every other string, starting with string #15 and do a row of DHH with string #1 as knot bearer.
|
 |
Step 5:
Left side: Use string #16 as knot bearer; make one row of DHH diagonally towards left. Then use string 15 as knot bearer and do the same, but do not knot string #16 and #15 together.
Right side: Do like on the left side, but use string #1 and string #2 as knot bearers.
|
 |
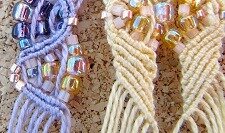
Step 6:
Left side:
Add beads like this:
- On string #16 – one B, one F, one G, one F, one B.
- On string #13 – One B, one F, one B one F and one B.
- On string #11 – One B, one D and one B.
Use string #9 as knot bearer; make a row of DHH along the beads so that you make a triangle. Add one D on string #10 and make another a row of DHHs.
Right side:
- On string #1 – add one B and one F. Instead of adding the G bead, lead the string through the G you added on the left side. Then add one F and on e B.
- On string #3 – add one B, one F, one B, one F and one B.
- On string #6 – add one B, one D and one B.
Use string #7 as knot bearer; make on row of DHH along the beads like you did on the left side. Add one D on string #8 and make a row of DHHs.
|
 |
Step 7:
Left side: Use string #1 as knot bearer; make a diagonal row of DHHs.
Use string #2 as knot bearer and make another row of DHHs, but not knot string #1 and #2 together.
Then add beads like this:
- String #1 – one A, one E, one H, one E and one A.
- String #3 – one C, one E, one C, one E and one C
- String #6 – one A, one C and one A.
Use string #15 as knot bearer and make a row of DHHs along the beads. String one D on string #16 and use it as knot bearer. Make a row of DHHs. Do not knot string #15 and #16 together.
Do the same on the right side, using string #16 and #15 as knot bearers in the first move, then add beads to strings #11, 14 and 16. And use strings #2 and #1 as knot bearers.
|
 |
Step 8:
Left side: Use string #9 as knot bearer make on row of DHHs. Repeat with strings #10, 11 and 12.
Right side: Use strings #8 as knot bearer and make one row of DHHs. Repeat with strings #6, 5 and 4.
|
 |
Step 9:
Left side:
Add beads like this:
- String #8 – one B, one F, one G, one F and one B.
- String #5 – one B, one F and one B.
- String #3 – one B, one A and one B.
- String #1 – three A.
Use string #1 as knot bearer and make one row of DHHs. Then use string #2 as knot bearer and make another row of DHHs, but do not tie string #1 and #2 together.
Repeat on the right side, using string #16 and 15 as knot bearers, and add beads to string # 9 ,12, 14 and 16.
|
 |
Step 10:
Left side: Add one A to every other string, starting with string #9. Then make a row of DHHs with string #9 as knot bearer.
Repeat on the right side, using string #8 as knot bearer.
|
 |
Step 11:
Repeat step 7. |
End of Yellow And Purple Macrame Bracelet – Part 1
Go to Yellow And Purple Macrame Bracelet – Part 2
Go to Part 3
Return from macrame bracelet to Jewelry Tutorials
Go to Home Page
Contribute with YOUR tutorial
My dream is to make this site the largest and best jewelry making site there is. Where you can find tutorials on every aspect of jewelry making, a real tutorial heaven for crafters around the world.
But, I need your help. Adding only my own tutorials will not give my visitors what they seek, so YOUR tutorial is very valuable not only for me, but for all the people visting this site. With your help, I may achieve my dream, to make this a true tutorial heaven.
|
|
|
