Store
The Basics
Tutorials
Read about
Other Stuff
|
Online sales are temporarily suspended !!
Contact the seller in advance before paying for the order!
Make A Light And Lacy Macrame Bracelet

If you like something light and lacy, this macrame bracelet may be just for you. I have chosen not to make it symmetrical when the colors are concerned, but if you like it to be alike on both sides, just swap the colors around as you please.
Being fairly new to macrame, I have spent some time to search for the right type of cord. I wanted to make a micro macrame bracelet and a cord thin enough to pass through seed beads #11 was what I was looking for. I eventually ended up with thin crochet cord in cotton.
A crucial thing for having success with micro macramé is to add glue or nail polish to the last 1-2 cm on each string. By doing this, you do not need a needle to string the beads, as the glue makes the tip stiff enough to get the beads on easily. This also removes the problem you bump into if you use a needle, where you have to pull the folded cord through each bead. Gluing the ends enables you to use #11 and even #15 seed beads, without having to fight every single bead.
So, are you ready to begin your macrame bracelet? OK, here we go:
What you need:
- Thin crochet cord in black, pink and white
- Purple seed beads in size #11 and #8
- Light pink seed beads #11
- Pink seed beads in size #6
- Silver colored cube beads
- One slide lock clasp with 5 loops
- Glue or Nail polish
 |
Step 1:
Cut 4 strings of black cord, each 160 cm.
Cut 2 strings of pink cord, each 160 cm.
Cut 4 strings of white cord, each 160 cm.
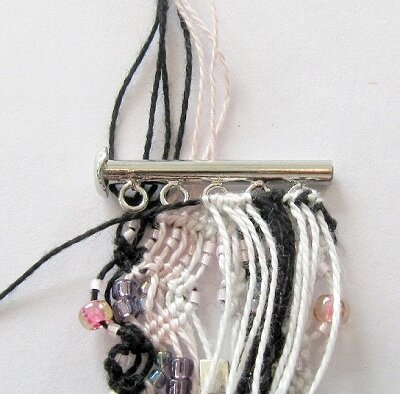
Fold the cords in half and attach them to the loops on the clasp with a larks head knot in the following order:
- 1. loop: 2 black
- 2. loop: 2 pink
- 3. loop: 2 white
- 4. loop: 2 black
- 5. loop: 2 white
Add glue to all the ends.
|
 |
Step 2:
Use the left string as your anchor cord (AC) and make two rows with horizontal double half hitches (HDHH) |
 |
Step 3:
String two light pink #11 seed beads on every other string. (On the photo you see that I have used purple seed beads for the right half of the bracelet. I abandoned that and strung on light pink ones before I did the right hand side.) |
 |
Step 4:
Start on the left side and make a row of horizontal double half hitches just below the seed beads, the first 9 cords. This will leave you with 10 strings on the right side. Put those aside with a needle, while you work on the left side. |
 |
Step 5:
Start again on the left side and make a row of HDHHs, but do not use the last string on the right side. It will be one of the anchor cords (AC) in step 6. |
 |
Step 6:
On the first left side cord, string on one pink #11, one pink #6 and one pink #11 seed bead. On the third string from the left, string on two purple #8 seed beads. On the fifth string from the left, string on two purple #11 seed beads. Use the string you brought over from the left hand side to the right as the AC and make HDHHs back to the left side. Try to tie the knots as close to the beads as you can. This will give you a diagonal angle on the knotted row.
Take the string you left out in step 5. String on a pink #11 seed bead, and then use it as AC. Make HDHH close to the row you just made, until you reach the left hand side. Repeat the step 3-6 on the right hand side of the macrame bracelet.
|
 |
Step 7:
String one pink #11 seed bead on the second string on the left hand side of the bracelet. String 2 purple #11 seed beads on the fifth string and 2 purple #8 seed beads on the seventh string. Do the same on the right hand side of the macrame bracelet. Add a silver cube bead to the two center cords (one from the right hand side and one from the left hand side). |
 |
Step 8:
Use the first string on the left hand side as AC and make HDHH until you reach the middle. Do the same on the right hand side. Again use the first cord on the left hand side as the AC and make another row of HDHH, but leave the last string (number 10) like you did in step 5. Repeat the steps 5 – 8 until you reach the desired length of the bracelet. |
 |
Step 9:
String two pink #11 seed beads on every second string, like you did at the beginning of the bracelet. Then using the left string as your AC, make HDHH across to the right side and back to the left side. |
 |
Step 10:
You will now attach the bracelet to the other side of the clasp. Start by turning the bracelet with the back side up. Put the clasp along the end with all the strings vertical behind it. Use the first string on your right hand side as the AC. Pull string nr 2 through the first loop of the clasp and make a HDHH. Repeat with the two other strings. In the second hole, start by pulling the first black string through and tie it around the AC with a HDHH. Repeat with all the strings in the same order as you started the macrame bracelet. |
 |
Step 11:
When all strings are tied around the AC, pull then down along the length of the bracelet. Add glue along the edge, close to the holes. |
 |
Step 12:
When the glue is dry, cut the strings as close to the knots as you can. The photo shows how it looks from the front. |

And this is what the macrame bracelet looks like when finished.
If you like a matching pair of earrings you can make them with this tutorial:
Make A Pair Of Light And Lacy Macrame Earrings
Return from Macrame Bracelet to Jewelry Tutorials
Go to Home Page
Contribute with YOUR tutorial
My dream is to make this site the largest and best jewelry making site there is. Where you can find tutorials on every aspect of jewelry making, a real tutorial heaven for crafters around the world.
But, I need your help. Adding only my own tutorials will not give my visitors what they seek, so YOUR tutorial is very valuable not only for me, but for all the people visting this site. With your help, I may achieve my dream, to make this a true tutorial heaven.
|
|
|
