|
Contact the seller in advance before paying for the order! Mixing Colors With Polymer ClayThe different polymer clay brands come in a huge amount of colors (hues) and effect clays like glitter, pearl, translucent and metallic. You can use them as they are, or you can mix them into beautiful color mixes.
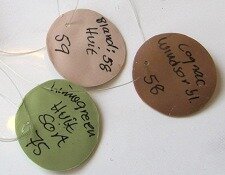
Mixing hues with polymer clay can be quite addictive, but a bit of a waste unless you write down how you did it. If you don't it is very difficult to reproduce that particular value if needed. There are many ways to mix hues, and after a while you will find your own way. In tutorials you can find receipts that are used for that particular tutorial. You take one part of this hue and mix it with so and so many parts of that hue. But what is a part? And what do you do if the colors mentioned are from a brand of clay that you do not have? What is a part?:
You can also regulate how much clay you want to mix, by the thickness of the sheet you cut the round shapes from. If you mix for making receipts, go for a medium setting on your pasta machine, that way the samples are thick enough not to break, but not so thick that you waste a lot of clay. Make samples: When you make canes, the hue of the colors are the key to success of failure. If they are too close in value, the pattern will be difficult to see. Putting hue samples next to one another, you can easily see if the huew are too close in value to give a contrast in the pattern.
I sort my samples by stringing them. A fishing line is perfect, as you can make a knot that is easy to open again when adding more samples. I have all the blue and purple shades on one string, the red on another, yellow and brown on one etc.
When you string them, make the string long. That will make it easy for you to separate the colors you want from the rest, and put samples together to see if they will be a good match for a project. Making samples is also a good way to see how the clay looks when cured. Some darken or change when cured. I have made samples of all the values straight from the pack, to be able to compare them to how they look when cured. Tinting and shading pure hues or mixes is also a good idea. That way you can see how they change when black or white is added to it. You can do this very accurate, by adding one part of the clay at the time from white to black, or set a standard amount of white or black that you mix into the value to get a hint of how the hue will react.
Colors and brands: So how can you find the right hue if you use another brand? Well, you may not be able to get the exact same one, but the result using one that looks remotely like it, may work just as fine or even better. You may however get some surprises. So know your brand's huew well Make samples of all the clays in their pure forms to see how they act when cured, how they act when tinted or shaded, and how they react with other hues. In Polymer clay color inspirations the authors have made a comparison chart with polymer clay primary and secondary hues with the names of the different polymer clay brands. You can use that, if you want to mix the exact same hue as you see in a tutorial, and I believe that is the closest you can get, unless you actually have samples of all the shades of the various brands of clay. Not pure hues: If you mix black that contains blue, with yellow, you get a dark green. If it contains brown, it will turn dark brown. Fimo soft's black contains blue, but another brand may contain brown. You can test clays by mixing them with primary hues – red, blue and yellow and with black and white. If you mix red that contain yellow with yellow, you get an orange. If it has blue in it, it will lean towards neutral brownish. Mixing with primaries, lures out the base mix of the clay you are testing, and will give you a hint towards which hue it will be great to mix it with.
The secret: Make samples like never before. After having read the book Polymer clay color inspiration, I now have special mixing days, when I only make samples. And there are thousands of mixes out there waiting for you to discover them. Mix, make samples and you have a world of hues to choose from, to mix and match. And, it is quite fun. Write down your mixes, so that you can make them again if needed. Translucent clay: Coming out of the oven, you have a totally different cane, as the hue you mixed into the translucent clay is the one showing, and it is no longer pastel. It have some translucency, but is darker than the uncured cane. This is important to remember when using translucent clay. The clay will change when cured. But again, it may turn out nicer than you expected. The bottom line: In the book Polymer clay color inspirations, you will find many ways to mix clay, how you can play with optical illusions and techniques to use texture and patterns to create unusual and beautiful patterns. If you want to learn all there is about hues and polymer clay, I would recommend you to buy this book. It is well worth your money. The book is richly illustrated, and has lots of projects where you learn how to use color to create stunning polymer clay jewelry, and how to find inspiration to broaden your knowledge of how polymer clay work. Return from Mixing Colors With Polymer Clay to Color Theory |


Add YOUR Tutorial
Promote Your Page Too
