Online sales are temporarily suspended !!
Contact the seller in advance before paying for the order!
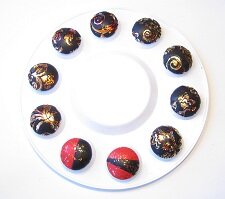
Eye Catching Chinese Brocade Beads
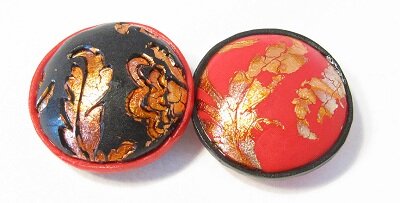
I don’t know if there is such a thing as Chinese brocade beads, but that was the first thing that came into my mind, when I had made these beads. Red, black and gold, they kind of looked oriental to me.
I made this tutorial mainly so that you can see one of the amazing ways you can use the Variegated Composition leaf.
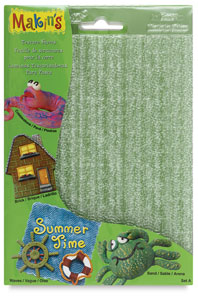
These metal leafs are most beautifully patterned, and you can get them in shades of red, green and black. This means that the gold has a deep, warm tone, with patterns in reddish, greenish or blackish. They bring more life to your projects than simple gold leaf, and are amazing with the technique used in this tutorial.
The leafs are quite big, 5x5 inches, so you can cover large areas of clay with only one sheet. They are fluffy though, so it will flutter around if you are not careful. I find them a bit tougher than other types, and that they don’t break into smaller pieces as easy as other metal leafs, which is an advantage when you handle it. They also do not crackle so easy and that makes them perfect for this technique. They do tarnish though and needs to be varnished in some way after curing the clay.
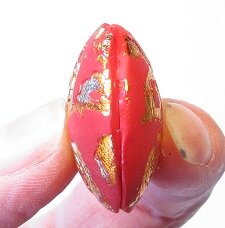
I chose to make Puff beads. They are hollow and therefore very lightweight despite their size. The size let the pattern and the variegated composition leaf come to their best appearance, as you can use large patterns. I also chose the pattern to be flowery, as that reminded me the most of brocade, hence the name.
But now you are probably eager to begin, so enough talking, let’s go to action.
What you need:
- Fimo Soft in x-mast red, black and Sunflower, or your preferred clay in red, black and yellow
- Variegated Composition leaf – red
- Texture sheet, large and flowery. The one I have used is from Studio by Sculpey. Sadly I think that these and many other products from Sculpey are discontinued)
- Paint palette with round holes
- Clay gun with a small round disc
- Liquid Polymer clay
- Super glue
- Polymer clay varnish
Step 1:
Condition the clays well. Fimo’s x-mast red tends to darken when cured. To avoid this and get a radiant red, you need to mix it with equal parts of Sunflower. So mix 1 part Red with 1 part Sunflower. Run both the red and the black sheet through on a setting a little thicker than the thinnest (With 7 settings, this will be a number 2).
 |
Step 2:
Apply a sheet of the variegated composition leaf onto the red sheet. Use your finger to remove trapped air. |
 |
Step 3:
Put the texture plate on top of the sheet and roll over it with an acrylic roller. Hold the plate in place so that it does not move, and press firmly to make a good print. There is no need to spray the clay sheet with water or cornstarch. The metal leaf prevents the texture plate from sticking to the clay. |
 |
Step 4:
Use a flexible tissue blade and very carefully shave off the upper parts of the print. This will leave the metal leaf only in the deeper parts, and create the beautiful pattern. If the clay sticks to the tissue blade or is difficult to shave off, put the sheet in the fridge for 30 minutes. It will then be firm enough to be shaved. |
 |
Step 5:
Use a round shape cutter that fits over the cups of the paint palette. Cut out as many shapes as you can from the sheet. Each bead needs two discs, so you need a paired number. |
 |
Step 6:
Put the discs onto the paint palette. Press the edges so that it has a tight fit, and to remove trapped air. My paint palette is of plastic, but can take the heat needed to cure the beads, without melting. Test yours beforehand, so that you now it will not melt. |
 |
Step 7:
Repeat the steps with the black clay. |
 |
Step 8:
To make one or two accent beads, run the scraps of the clays through the pasta machine. This will crackle the gold into small bits. Run them through on the same thickness as the red and black sheets were, and cut out discs with the shape cutter. Cut the discs into pieces of two or more and put them together into discs that are black and red. Again remember to make pair, as you need two discs to make one bead. |
|
Step 9:
Cure the beads for 30 minutes. When they are cold, sand the edges so that they are plane. You do this best by sanding them flat onto the sandpaper. You can speed up the cooling process by holding each piece under cold running water until it is firm and cold. |
 |
Step 10:
When sanded, glue two and two pieces together with super glue. |
 |
Step 11:
Condition some more red and black clay. Feed first the red into the clay gun, and extrude one long thin round snake. If you use the Kemper clay gun, use the second to thinnest round disc. If you use the Makin’s, find one that fits into the groove between the two dome halves. |
 |
|
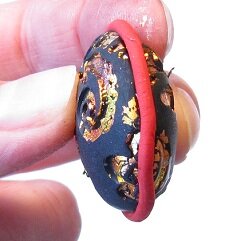 |
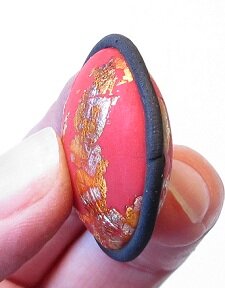
Step 12:
Apply some liquid clay into the groove, with a thin brush. The liquid clay will work as a bonding between the cured and raw clay. Apply the snakes, black on the red and red on the black beads. Press it carefully into the groove, so that it fits well. Do not worry if it gets a bit bumpy on the outer edge. You will be sanding that away later.
Cure the beads again for 30 minutes.
|
 |
Step 13:
When the beads are cold, use a sanding stick with rough sandpaper and sand the round snake flat and even. Do not sand the domes, as you then will sand off the metal leaf. |
Do you need Variegated Composition leaf? You can buy it here at Dick Blick Art : Variegated Composition Leaf
Return from Eye Catching Chinese Brocade Beads to Polymer Clay Tutorials
Go to Home Page
Contribute with YOUR tutorial
My dream is to make this site the largest and best jewelry making site there is. Where you can find tutorials on every aspect of jewelry making, a real tutorial heaven for crafters around the world.
But, I need your help. Adding only my own tutorials will not give my visitors what they seek, so YOUR tutorial is very valuable not only for me, but for all the people visting this site. With your help, I may achieve my dream, to make this a true tutorial heaven.