Online sales are temporarily suspended !!
Contact the seller in advance before paying for the order!
Cobalt Blue Elegance With Right Angle Weave
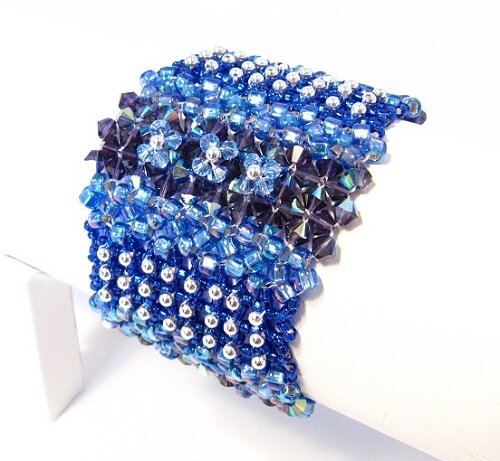
This bracelet is made with Right angle weave. It is such a beautiful bead weaving technique, with lots of potential to create stunning stuff. This bracelet is not so complicated, but still gives the impression of elegance, due to its cobalt blue and the sparkling Swarovski crystals.
If you don't know how to do RAW, you can learn it here.
What you need to make this right angle weave bracelet:
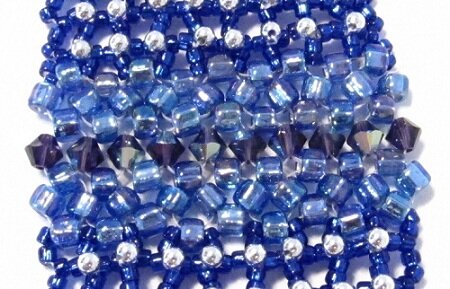
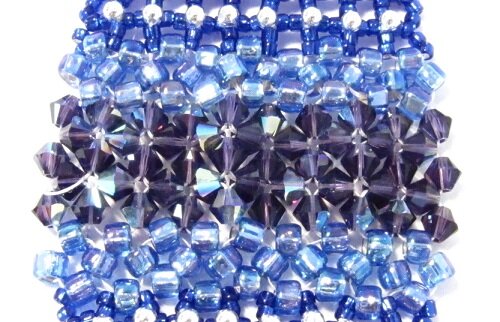
- #6 Dynamite seed beads in Silver lined, square hole, rainbow blue.
- #11 Dynamite seed beads in Silver lined, square hole, cobalt blue.
- 4 mm Swarovski bicone crystals in Purple velvet AB.
- 2 mm round silver plated beads.
- 12 3 mm Swarovski bicone crystals in Sapphire AB.
- 2 cobalt blue round, faceted crystal beads, 8 mm.
- Fireline
- Elastic beading thread.
- Beading needle #12.
Step 1:
Cut a comfortable length of Fireline and tie the ends together with a surgeons knot. Trim the ends, and if you have one, burn the ends with a thread burner.
Add 4 #6 seed beads, go through the threads loop and back through the last seed bead. Cut one of the thread ends, and pull the thread so that you can continue with one thread. Go through all the beads one more time, and exit the bead opposite the first bead.

Add three beads and go back through all the beads one more time, exiting the bead opposite the bead you first came out of when you added the tree beads. Continue adding beads until you have 9 rounds in row.
Continue right angle weave until you have three rows.
Step 2:
On the fourth row, add 6 #11 seed beads. Then add four in the next round, and continue adding this along the row. On the fifth row, you also add 6 #11's and then four in each round. Do the same for row 6 and 7.

Step 3:
In row 8, add two #11, one #6 and two #11. In the next round, two #11 and one #6. Continue down the row.
Step 4:
In row 9 you add three #6 seed beads, and in the next round you add two #6. Finish the row.
Step 5:
In row 10, you add one 4 mm bicone, one #6 seed bead and one 4 mm bicone. In the next round you add one 4 mm bicone and one #6 seedbead. Finish the row.
Step 6:
In row 11, add three #6 seed beads. In the next round, add two #6. Finish the row.
Step 7:
Repeat step 2 to step 4.
Step 8:
Add three 4 mm bicones, and then two 4 mm bicones throughout the row. Do the same the next row.
Step 9:
Add one 4 mm bicone, one # 6 seed bead and one 4 mm bicone. In the next round add one 4 mm bicone and one # 6 seed bead. Finish the row.

Step 10:
Finish the bracelet by reversing the steps 1 to 4.
Step 11:
You will now embellish the right angle weave bracelet with the silver beads. Stitch one 2 mm silver bead in the gap in the corners of the square nets made with the # 11 cobalt blue seed beads. You can do this row by row, by going through two seed beads, add a silver bead, go through the next two seed beads etc.

Step 12:
Add the 3 mm bicones on top of the crystal belt in the middle of the bracelet. Put the first set of 3 mm bicones, three beads from the edge. The other in the middle and the third three beads from the other side.
You add them like this:
Exit from the top of the third bicone from the side, add one 3 mm bicone, one 2 mm silver bead and one 3 mm bicone. Go through the next 4 mm bicone from the bottom and exit from the top. Add one 3 mm bicone, go through the silver bead and add one 3 mm bicone. Go through the first 4 mm bicone you passed through from the bottom and up. You stitch like an X.

Step 13:
Sew on the two 8 mm crystals on one end of the right angle weave bracelet, and add two elastic loops with 11 #11 seed beads on each, on the other side.
The length of this right angle weave bracelet is 17 cm. If you want it longer, add extra rows where you want them until you reach the length you want.
Return from Cobalt Blue Elegance With Right Angle Weave to Beading instructions
Go to Home Page
Contribute with YOUR tutorial
My dream is to make this site the largest and best jewelry making site there is. Where you can find tutorials on every aspect of jewelry making, a real tutorial heaven for crafters around the world.
But, I need your help. Adding only my own tutorials will not give my visitors what they seek, so YOUR tutorial is very valuable not only for me, but for all the people visting this site. With your help, I may achieve my dream, to make this a true tutorial heaven.
