Online sales are temporarily suspended !!
Contact the seller in advance before paying for the order!

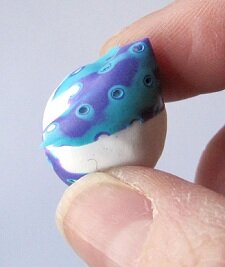
Beautiful Blue And White Nuggets

Blue and white polymer clay nuggets

These nuggets are made of Polymer clay with the Mokume Gane technique. The fun thing about making nuggets, is that you don't have to be as accurate as when you make round beads. You simply just shape them the way you feel like and they still look good.

I have not mixed the colors in these beads, but used them as they came out of the pack. The thin layers of the Mokume Gane mixes the colors slightly when the clay is imprinted and sliced, and create a beautiful mix of the two colors.

What you need to make these nuggets:

  • Polymer clay in three colors. I have used Fimo Soft plum, peppermint and Fimo Effect - glitter white.
  • One of those spiked trays that children put these small plastic roundels on. (I am sorry, but I don't know what they are called in English. I hope you can figure out what they are from the photos
  • A soft tissue blade
  • Bamboo rods

Sheets of polymer clay stacked

Step 1:

Condition the clay well. Run the two colored sheets through the thinnest setting on your pasta machine. Put one on top of the other and run them through the pasta machine one more time.

Cut the sheet in two. Put one on top of the other and run it through the pasta machine again.
Repeat one more time.


Texture tray and impressed clay

Step 2:
Dust the clay with cornstarch and stamp it with the spiked tray.


Cutting the Mokume Gane slices

Step 3:
Use the tissue blade and carefully cut thin slices of the clay. Put the slices aside on a piece of soft paper.
You will use the slices, so do not put them in a heap.


Scrap clay log and white clay for wrapping it

Step 4:
Condition some scrap clay and roll it into a log, approximately 1,5 cm in diameter. If you like bigger or smaller beads, make the log thicker or thinner as you please. Make sure you have no trapped air in the clay, before you shape the log.

Roll the white clay through the pasta machine on a medium to thick setting. White clay is always a bit translucent, therefor it is better to have this sheet a little too thick than too thin. That way you prevent the scrap clay from shining through.

Wrap the scrap clay log in the white clay.
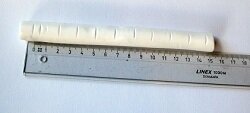


Measuring to get even sized nuggets

Step 8:
Put the log next to a ruler and mark every 1,5 cm.

You can also use a Marxit or a Poly ruler.
Cut the log into pieces. These will be your beads.


Forming the nugget

Step 9:
close the ends of the slices, by gently pinching and dragging the white clay together with your fingers. If you don't manage to close it completely, don't worry. It will be covered by the mokume gane slices in the next step.


Adding the Mokume Gane slices onto the nuggets

Step 10:
Add the slices you cut of in step 3. Use your fingers to smooth them and remove trapped air. Finish by rolling the bead on your work surface, smoothing out the edges.


Piercing the polymer clay nuggets

Step 11:
Shape the bead into a nugget, by squeezing it in your palms until you get a nugget shape you like.
Pierce it with a bamboo rod, and leave it on the rod for baking.


Cleaning the Polymer clay nuggets with baby wipes

Step 11:
Wipe off fingerprints and clean the bead with baby wipes before you bake them. Repeat with the rest of the beads.

Step 12:
Bake the beads for 45 minutes.


When cool, glace them with liquid polymer clay, or sand, varnish or buff them if you want another finish than glossy.


Return from Beautiful Blue and White Nuggets to Polymer Clay Tutorials

Go to Home page

Contribute with YOUR tutorial

My dream is to make this site the largest and best jewelry making site there is. Where you can find tutorials on every aspect of jewelry making, a real tutorial heaven for crafters around the world.

But, I need your help. Adding only my own tutorials will not give my visitors what they seek, so YOUR tutorial is very valuable not only for me, but for all the people visting this site. With your help, I may achieve my dream, to make this a true tutorial heaven.

Enter the title of your tutorial here