|
Contact the seller in advance before paying for the order! Black And White Kaleidoscope Cane
I remember when I as a kid got a Kaleidoscope. I loved the patterns and colors that changed every time I turned the lens. When my husband and I went for a trip to New Zealand a few years ago, we found a tiny little place in the middle of close to nowhere, where a man made kaleidoscopes.
He used the beat of music to change the patterns, made some of seeds and pearls, buttons and pins. He even had a big one in which you could see the surroundings through a pattern changing lens. I was awestruck by the beauty they presented, just as I was as a kid. And there is something magic about them, their varying patterns, the lovely colors and the mystery of how they are made. Working with polymer clay, you can make your own kaleidoscopes. You can naturally not change the patterns rapidly, but using simple canes, you can make several patterns one slice at a time. It is a wonderful way to use leftover canes. The use of contrasting colors can make striking patterns and toned down colors leaves a hint of mystery to your designs. Some polymer clay artists master the art of caning to perfection, and create pattern that seems impossible to achieve for mortal polymer clay artists like me. In the long run, it all boils down to simple canes being put together to enhance one another and together build a pattern which is again put together into another pattern, and so on. To be good at this, you need to have a perspective on how they will complement one another when you put 4-6 slices together into a pattern. But despair not, you sometimes get some amazing result from randomly put together canes also. I am no big master at this art, and use the last approach most. What is good I keep, what is not, becomes scrap clay. The kind of clay you use for caning may be the key to flop or success. The firmer the clay, the less distortion of the pattern. If the clay is to soft, the patterns will be uneven and it may be difficult to get the pattern remain the way it was meant to. You can however put the canes in the freezer or fridge for half an hour after you have made them, and do the same when you have made the patterned cane. This will make the clay firm enough to hold the pattern while you work. The concept is quite simple. You make a patterned cane from several canes put together. Then you shape this cane into a triangular cane, cut slices and put them together into marvellous pattern. Are you ready to give it a try? OK! Let's start on your first kaleidoscope cane. Making the canes:  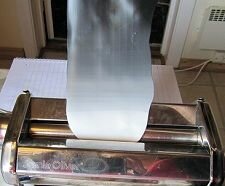
Skinner blend cane: 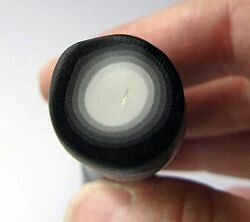
Roll the strip into a cane starting on the white side. Put it aside. 
Bulls eye canes: 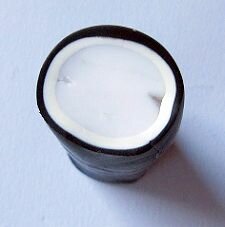
Make a log with the translucent clay. Run white and black clay through the pasta machine on a medium setting. Wrap the log in the white sheet, and then the black sheet.

Making the patterned cane: 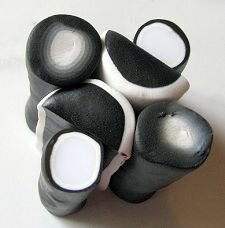
Cut all three canes in two and in the same length. Split the black bulls eye cane in two halves, and put them together again with the vaulted sides against each other.
Carefully begin to shape the patterned cane into a triangle. Use a glass plate or something similar to flatten the three sides thoroughly and with as little distortion of the pattern as possible. Try to get the ridges as sharp as you can. 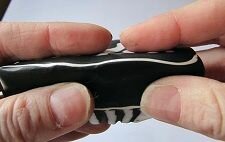
When the cane is shaped well into a triangle, you need to reduce it. You do this by carefully pinching and pushing it thinner lengthwise on the work surface, and twisting and pulling it with your hands. This cane is only one sixth of the total kaleidoscope pattern, so reduce it quite a bit, or the finished pattern will be very large. 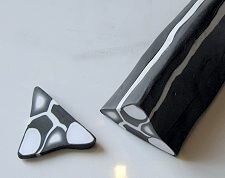
Now, you can do two things. You can either cut the cane in 6 pieces and put them together into a kaleidoscope cane, or you can cut slices and put them together on the work surface. I prefer the last approach as I then can get several patterns, not just one, so I will do that here. 
If the cane now is too soft, put it in the fridge for half an hour. When firm, cut six slices of the cane. Try to get them the same thickness. Put three of the slices together first. Be careful so that you get the same patterns on each side of the triangles together, if not your pattern will not make any sense and you loose the kaleidoscope pattern. Do the same with the other three slices, and then put the two halves together. 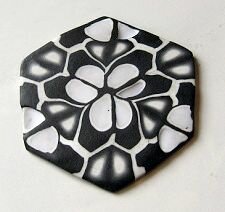
When you put the slices together use a tissue blade to straighten the sides of each triangle and sharpen the corners, so that they fit together easily and have the same size. Do the same around the complete pattern when the two halves are put together. Put a piece of paper on top of the slice and carefully roll over it with an acrylic roller, to make it of equal thickness all over, and smooth the joints. 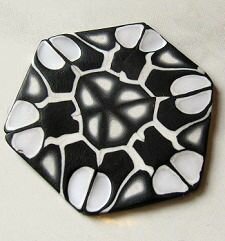
Cut six new slices and put them together in a different pattern. Using 6 slices put together you can make three patterns. You get additional two if you put 4 slices together.

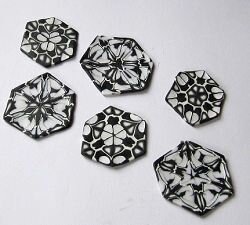
Now you can start using the complete slices on beads, pendants and other cool stuff that you want to make with it. I have found that Kaleidoscope canes often look very nice when they are vaulted, like in this photo. This was a very simple cane, only to show you its potential. Experiment as much as you can, and I promise you will make stunning beads that will admired by many, in no time.
Return from Black And White Kaleidoscope Cane to Polymer Clay Tutorials Contribute with YOUR tutorialMy dream is to make this site the largest and best jewelry making site there is. Where you can find tutorials on every aspect of jewelry making, a real tutorial heaven for crafters around the world. |