Online sales are temporarily suspended !!
Contact the seller in advance before paying for the order!
Kaleidoscope Cuff Bracelet

Kaleidoscope canes are fun to make. The canes used are very simple, but the pattern looks like it is extremely complicated to make, which it really isn't. The challenge is to find colors with different value.
If they are to close in value, the kaleidoscope pattern will be difficult to see, despite the different hues.
When it comes to Hues, I had something entirely different in mind than what the outcome turned out to be on this bracelet. But, I think it came out quite nice despite that. And that is how it usually is when I make kaleidoscope canes. In my mind I want these colors, but when they are put together it looks nothing like what I intended. It is pretty exiting actually, not knowing. And sometimes it comes out as a really positive surprise, like this bracelet did.
So, do you want to give it a go? OK!
What you need is:
- Polymer clay: Raspberry, Windsor blue, white, translucent, black and plum
- Copper cuff
- Pasta Machine
- Tissue blade
- Acrylic roller
- Liquid polymer clay
- Sandpaper for wet sanding, 200, 400, 600 and 1200 grit
- Denim or other rough textile

Step 1:
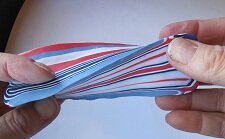
Condition the clays well with your pasta machine. Run the black clay through on the thickest setting, and put it onto the copper cuff. Use a tissue blade to cut along the edges. Bake it for 30 minutes.
While it bakes, you will make the canes for the kaleidoscope cane.

Step 2:
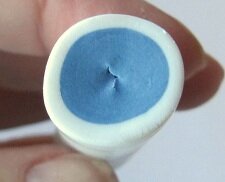
Make a carrot Skinner blend with plum and white clay. Roll it up into a cane, and push it into a plug. You do this by rolling the cane on your working surface, and at the same time push the ends towards the middle of the cane. The opposite of what you do when you reduce a cane. When done, flatten it with your hands or with an acrylic roller.

Step 3:
Run the plug through the pasta machine, white end first. Run it through on thinner and thinner settings until you have one long, thin strip.
Roll it into a cane starting at the plum colored end. Put it aside.

Step 4:
Mix one part white with 1/4 part Windsor blue. Run it through a medium setting and wrap the skinner blend cane in it.
Step 5:
Roll the rest of the blue clay from step 4 into a log, and wrap it into a white sheet, run through the thickest setting.
Step 6:
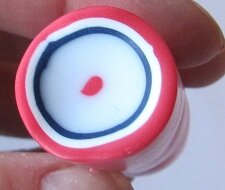
Make a thin snake from the raspberry clay. Wrap it two times with translucent clay. Add a thin sheet of Windsor blue, a thin sheet of white and a medium sheet of raspberry clay.
Step 7:
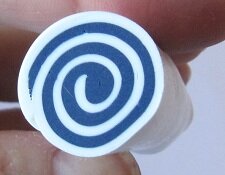
Run a white and a windsor blue sheet through a medium setting. Put the blue on top of the white. Cut the ends slanting towards you. Roll the sheet up into a jelly roll.
Step 8:
Now you have made all the canes, and will start to build the kaleidoscope cane.
Cut the cane from step 6 in two. Reduce one of the pieces to half it's thickness. Split the other half in two halves. Do the same with the jelly roll.
Step 9:
Reduce the cane from step 5 until you can cut it in 4 pieces, each as high as the split halves from step 8. Reduce the skinner blend cane until you can cut it in 4 pieces. Split two in halves.
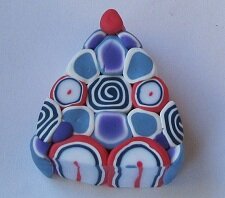
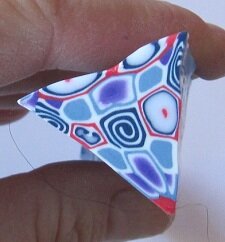
Start putting the canes together like you can see on the photo, or in your own order. Put a raspberry snake on the top of the triangle. Fill inn with windsor blue, if you need to fill some space between the cane parts.
You now have one large triangular cane/slice, created from the canes. This is the cane you will put together into the kaleidoscope slices
Step 10:
Start reducing the cane, by carefully pushing and squeezing it with your fingers against the working surface. Turn it around as you go, so that you flatten the sides, and make the edges sharp.
When it is a little longer, start twisting it. This will pull the cane out in length. Put it back on your working surface and push and squeeze again to flatten the sides and make sharp edges.
Continue using these two steps until you have reduced it to a triangular cane of proximately 2,5 cm each side.

Step 11.
Now you can put slices from this cane into kaleidoscope slices. Cut 6 slices from the cane, each about 3 mm thick. Put three of them together, the red tip in the center. Make sure that you put the similar sides together. Flip the slices over until you find out what matches the previous slices pattern on the side that will join.
Do the same with another thee slices.
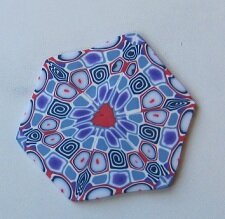
Step 12:
Put the two halves together into one six sided slice. Put a piece of paper on top and roll over it with your roller until the surface is smooth. Rub the joining lines with your finger. Do this on the paper, since it will prevent you from smudging the slices. Push the sides towards the center with our tissue blade, until it looks like an even 6 sided slice.

Step 13:
Use a rectangular cutter proximately 1,7 x 4 cm, and cut out the center piece of the slice.

Step 14:
Cover the baked cuff with a black sheet run through on a medium setting. Use some liquid polymer clay as glue between the cured and the raw clay. Cut the sides clean.
Apply the cut kaleidoscope slices onto the cuff. Start on the middle and work you way towards the ends of the cuff, length wise. Do one half first, and put the other half so that the pattern is set off to the side from the first half.

When the whole cuff is covered, put a piece of paper on it, and smooth all the seams with your finger. When done, cut the excess clay along the edge of the cuff. Cure it for 30 minutes.

Step 15:
When the cuff is cooled off, remove the copper cuff and sand the edges of the clay cuff until they are smooth. Condition some more black clay and run it through a medium setting. Add some liquid polymer clay along the edge of the cuff, and apply long strips of the black clay around the edge. Cut away excess clay. Cure the cuff for 30 minutes.
Step 16:
When the cuff is cool, sand it thoroughly. Start with 200 grit wet sandpaper, and work you way thorough 400, 600, 800 and finish off with 1200. Sand until you no longer can feel the joined lines between the slices or along the edge. Buff the cuff to a satiny sheen with a piece of denim or other rough textile.
And that was it. Your kaleidoscope bracelet cuff is ready to be worn.
Return from Kaleidoscope Cuff Bracelet to Polymer Clay Tutorials
Go to Home Page
Contribute with YOUR tutorial
My dream is to make this site the largest and best jewelry making site there is. Where you can find tutorials on every aspect of jewelry making, a real tutorial heaven for crafters around the world.
But, I need your help. Adding only my own tutorials will not give my visitors what they seek, so YOUR tutorial is very valuable not only for me, but for all the people visting this site. With your help, I may achieve my dream, to make this a true tutorial heaven.
