Online sales are temporarily suspended !!
Contact the seller in advance before paying for the order!
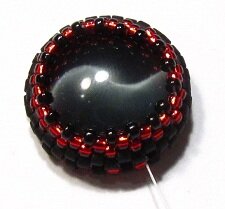
Spectacular Snake Eye Ring

I simply adore this snake eye ring.
Having a large and sparkling ring simply draws attention. This especially if the ring is different from what we normally see, and this sparkling ring, is very different indeed.
The snake eye cabochon is a type of cat's eye. Instead of a straight line in the center, this has an S-shaped one. Snakes doe not have S-shaped pupils, but it is called snake eye anyway. The S do resemble a slithering snake, so the name is not totally out of the blue. No matter what, it is a dramatic cabochon, and I thought it needed some dramatic ornamentation to back it up. The result was this snake eye ring.
What you need to make the snake eye ring:
- One ring base, adjustable
- One snake eye cabochon, 14 mm
- 17 Red triangular seed beads #5
- 17 Swarovski bicones, 4 mm jet (black)
- Delica seed beads #11 matte black
- Delica seed beads #11 silver lined dark red
- Rocailles #15 Opaque black
- Rocailles #15 Transparent silver lined garnet
- Fireline
- Beading needle #12
Step one:
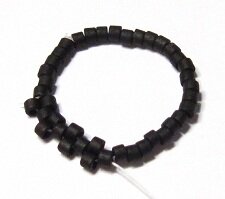
Cut a comfortable length of Fireline and tie the ends together with a surgeons knot. String 36 matte black Delicas. Bring the needle through the tied end of the tread and go back through the last seed bead strung, and 6 more beads. Cut one of the threads. Trim the ends of the knot and pull it into a bead. Do one round of Peyote stitch. This will give you three rows of matte black beads.

Step two:
Do three rows with the red #15 Rocailles. When done, go through all the raised beads one more time, to pull the beads tighter together. Put the cabochon inside the ring with the flat side resting on the red ring you made. Stitch your way through the beading until you come out of one of the black #11 on the other side of the ring of beads.
Step three:
Do two rows with red #15, like in step two, and then one row with black #15 rocailles. Pull tight so the cabochon lies secure inside the bezel. Weave your thread back through the beading until you exit one of the black beads in the middle row.

Step four:
Add a triangular bead, a bicone and a #11 red bead. Go back through the bicone and the triangular bead, skip a bead in the base row and go through the next raised bead. Add another triangular bead, bicone and seed bead and repeat until you have added fringes around the whole bezel. Weave the thread through the rows until you are on the last of the rows on the back side of the cabochon.

Step five:
Stitch the cabochon onto the ring. This is a bit tricky, but do the best you can until it sits tightly onto the ring. Use only the last row of beads for this. Don't worry if it looks bad, you will cover it up in the next step.

Step six:
Weave your thread through the rows of bead until you are on the red row next to first black row. Add a black #15 and continue in peyote around the row. Then continue doing peyote until the plate of the ring is covered, like you can see on the photo. Tie of the thread, and your snake eye ring is finished.
Add YOUR tutorial
Return from Spectacular Snake Eye Ring to Beading Instructions
Go to Home Page
Contribute with YOUR tutorial
My dream is to make this site the largest and best jewelry making site there is. Where you can find tutorials on every aspect of jewelry making, a real tutorial heaven for crafters around the world.
But, I need your help. Adding only my own tutorials will not give my visitors what they seek, so YOUR tutorial is very valuable not only for me, but for all the people visting this site. With your help, I may achieve my dream, to make this a true tutorial heaven.