Online sales are temporarily suspended !!
Contact the seller in advance before paying for the order!
Violet Inked Polymer Clay Beads

Because of the transparency of the ink, these inked polymer clay beads have a special tranquil look. The white clay of the core bead shines through the ink, enhancing the color of the beads, making them glow.
I never really thought of using ink in this way, until I read about it in a forum, and was amazed about the ceramic or porcelain looks of the polymer clay beads I saw there. So I decided to give it a go, and this was the result.
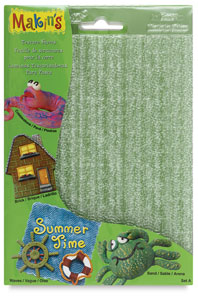
What you need to make these beads:
Are you ready to start? OK! Here we go.
Step 1:
Cut thin slices of the white clay and condition it well. Run it through on the thickest setting. Use a shape cutter to cut out slices from the clay sheet. Each slice will become a bead. This way you will get the same size on all the beads. The shape of the cutter doesn't matter.
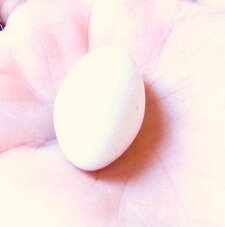 Step 2:
Roll each slice into an oval bead between your palms. Just roll it with large circles and it will automatically become oval. If the tips get too pointy, just push them into a rounder shape with your fingers. Pierce the bead with a bamboo rod.
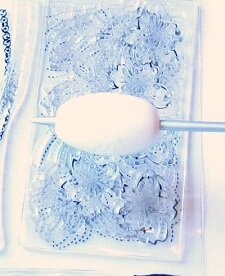 Step 3:
Prepare your stamp by dusting it with a bit of corn starch. Roll the bead over the stamp. Check that you are content with the pattern. If not, just roll the polymer clay bead in your palms again to remove the pattern, and roll it over the stamp one more time.
 Step 4:
Now, you are going to paint the bead. Put a few drops of the ink in a paint palette. Use a soft brush and apply the ink to the beads. If you want the bead darker, apply one more layer. Preferably the ink shall fill the low parts of the pattern, so that these appear darker than the rest of the bead. The ink dries very quickly, so you have to work fast. Add more ink when needed.
Step 5:
Bake the beads for 30 minutes and let them cool. If you find that the pattern doesn't seem darker than the surface of the polymer clay bead, you can sand the surface a bit, to make a contrast between the lower and higher parts of the pattern.
Step 6:
When the beads are cold, they are ready for glazing. In your paint palette, add some liquid polymer clay and two to three drops of ink. Stir it until it is well mixed. Stir carefully so that you avoid air bubbles. Pour liquid clay in another cup in the palette and add silver Mica powder. Add until you have a thicker paste, but still running.
Step 7:
Use a soft brush and apply the inked polymer clay to the bead. Go over with the brush from bottom to top, to remove potential air bubbles. Check the silhouette of the bead towards a darker background to see if you have removed them all.
Use the heat gun and heat the bead until it is satiny. See this tutorial on how to do this if you haven't done this before. Apply two more layers of inked liquid clay.
Before you heat the last layer, apply the silver paste with a bamboo rod. This way you can make thin lines or thick splotches, just the way you like. Use the bamboo rod to draw the two colors into each other, creating patterns. When content, heat it with the heat gun like described above.
Step 8: Let the beads cool off. Re-heat them if they are not shiny enough. Should the beads feel rubbery after you are finished, you can put them back in the oven for about 20 minutes. Sometimes tubes of clay protrude from the holes of the bead, because of the bamboo rods. Just cut these off with a sharp pair of scissors.
And that was it. Your polymer clay beads are now ready for use. You can see them used in a necklace in this tutorial.

Return from Violet Inked Polymer Clay Beads to Polymer Clay Tutorials
Go to Home Page
Contribute with YOUR tutorial
My dream is to make this site the largest and best jewelry making site there is. Where you can find tutorials on every aspect of jewelry making, a real tutorial heaven for crafters around the world.
But, I need your help. Adding only my own tutorials will not give my visitors what they seek, so YOUR tutorial is very valuable not only for me, but for all the people visting this site. With your help, I may achieve my dream, to make this a true tutorial heaven.