Online sales are temporarily suspended !!
Contact the seller in advance before paying for the order!
Lovely Mokume Gane Nuggets In Pearly Green, Gunmetal And Blue

I actually intended to make something else with this mokume gane sheets, but it didn't turn out as I planned, so I made some nuggets instead. The technique used is very simple, and I am not sure if it really can be called mokume gane, but since it is made with layers of clay that is manipulated and then shaved, I have put it in this heap of tutorials.
What you need:
- Fimo soft: Tropical green, black, Lemon and Brilliant blue
- Fimo Effect : metallic white
- Pasta Machine
- Tissue blade
- Kemper tool, heart shaped
- Rippel blade
Step 1:
Condition the clay well.
Mix 1 part metallic white with 1/2 part Tropical green and 1/4 part Lemon. Run the green sheet through on a medium setting. Run the black clay through on the thinnest setting, and place it on top of the green one. Smooth it well to expel trapped air.

Step 2:
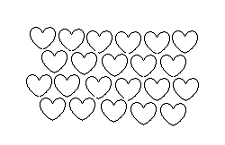
Use the heart shaped Kemper tool and make the pattern. The hearts shall be on a line as shown in the diagram.

Step 3:
Use a soft tissue blade and start shaving off the black sheet. Be careful so that you don't cut too deep and remove the heart shapes. Shave until you have only thin lines left of the hearts. Put it aside.
Step 4:
Run the blue sheet through on a medium setting, and the metallic white on the thinnest setting. Put the white sheet on top of the blue and smooth it well to remove trapped air.

Step 5:
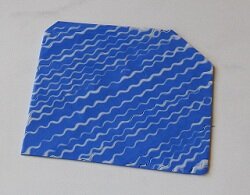
Use the ripple blade and make the pattern dianonally from corner to corner, and then lines next to each other with different distances between. Some close and some further apart.
Step 6:
Use the soft tissue blade and shave off the white sheet like in step 3.
Step 7:
Mix the shavings from the blue and metallic white sheet. This will give you a middle blue metallic color.
Mix the black clay with the shavings from the green and black sheet. This will give you a gunmetal color.
Step 8:
Condition some scrap clay. Roll it into a log and cover it with the gunmetal sheet. Roll it out to a thinner log, and mark every 1 1/2 cm.
Cut the pieces from the log, and close the ends so the scrap clay doesn't show. Roll each piece into a round bead.
Step 9:
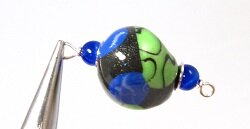
For the larger nuggets, you will use both mokume gane sheets plus the metallic blue. Use a shape cutter and cut out shapes of the two mokume gane sheets and the blue metallic sheet and apply them randomly onto the beads. Roll the beads smooth on the surface and shape them into nuggets by squeezing them between your palms.

Step 10:
Roll the log with the gunmetal sheet a little thinner, and mark every 1 ½ cm and repeat step 8.
Cut shapes from the blue mokume gane sheet only and apply to the smaller beads. Roll them smooth on the surface and shape them into nuggets.
Step 11:
Pierce the beads with a bamboo rod and bake them for 30 – 40 minutes.
Step 12:
Glaze the beads with liquid polymer clay if you want shiny beads, or sand and buff if you prefer that.
And that was it!
See these nuggets used in a necklace
Return from Lovely Mokume Gane Nuggets In Pearly Green, Gunmetal And Blue to Polymer Clay Tutorials
Go to Home Page
Contribute with YOUR tutorial
My dream is to make this site the largest and best jewelry making site there is. Where you can find tutorials on every aspect of jewelry making, a real tutorial heaven for crafters around the world.
But, I need your help. Adding only my own tutorials will not give my visitors what they seek, so YOUR tutorial is very valuable not only for me, but for all the people visting this site. With your help, I may achieve my dream, to make this a true tutorial heaven.
