Online sales are temporarily suspended !!
Contact the seller in advance before paying for the order!
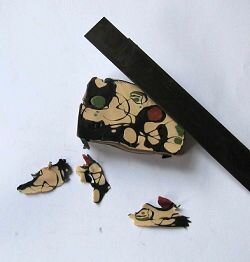
Lovely Earth Toned Mokume Gane Beads

In this Mokume gane technique, you use the shavings only. The stack is high and you cut through different layers of color, allowing the beads to slightly change base tone as you go along. They still keep the color combination though, but in varying amounts from layer to layer.
It is a fun technique since you randomly manipulate the stack with tools and small balls of clay. Since the layers of each color is quite thick for being Mokume gane, you may have to continue to manipulate it as you cut through the different layers.
The beads I made with the shavings are quite small, about 14 mm, but you can make any size you want. You decide that when you make the bead cores, as you will see in a little while.
So, are you ready to make some lovely Mokume gane beads? Let's start!
What you need for this tutorial:
- Fimo Soft in the following colors: White, Sunflower, Caramel and Black.
- Fimo Effect : Copper
- Cernit: Olive
- Soft tissueblade
- Thin rods for baking. I have used a 1,5 mm mandrel, but use what you have
Step 1:
Condition the clay. You are going to make three color mixes.
1. 1 part Caramel + 1/2 Sunflower = yellow brown
2. 1 part Olive + 1 part white = Light green
3. 1 part White + 1/8 Caramel = light brown
Run all the colors through on the same thickness. Use a round shape to cut out discs of the clays you shall mix. By parting the discs in four or eight parts, you can easily mix the colors exact.
 Step 2:
Run the three mixed colors, copper and black through a setting a little thinner than medium and stack them randomly, but put the black on top. Take care not to trap air between the layers.
Cut the stack in two, and stack the two parts, still with black on top.
 Step 3:
Use what you have of tools and cutters and make indentations in the stack. Use a pencil and make some deep holes. Fill them with small clay balls of the different colors. Squeeze and prod the stack with your fingers.
 If the stack gets very soft, put it in the freezer or fridge for half an hour, and take a small break.
Step 4:
Now you are going to make the bead cores. Condition some scrap clay and roll it into a thin log. Cut it in two. Condition some black clay and run through on a medium setting.
 If you don't have more light green clay, mix some more. Condition it well and run it through on a medium setting.
Wrap one log in black and the other in light green. Smooth them and try to get all the air bubbles out.
 Roll the logs into two long thin logs approximately 10 mm thick. Mark every 1 cm along the logs. Each cm will be a bead. If you want larger beads, measure accordingly. Cut one piece and carefully close the ends to hide the scrap clay. Roll the piece into a ball.
 Step 5:
Remove the stack from the fridge/freezer. Use a thin, soft tissue blade and start shaving off thin slices. Put them on a clean piece of paper, so that you can see the patterns emerging. This way you can pick the nicest ones, and ditch the not so nice ones. Check both sides of the shavings, sometimes the pattern is nicer underneath.
 Step 6:
Press the shaving onto the bead core, and roll it smooth in your hands or on the working surface. Apply as many shavings as you like to get a nice pattern on the bead. When satisfied, thread it on the rod. Wipe fingerprints and impurities off with a baby wipe, and it is ready for curing.
Repeat with all the beads, and make new indentations and manipulations to the stack as you cut your way through.
When all the beads are made, cure it according to the manufacturer.
Step 7:
When cold, choose the surface finish you prefer.
If you want glossy Mokume gane beads, you can glaze them with liquid polymer clay, or sand, buff and/or varnish it the way you are comfortable with.
Return from Lovely Earth Toned Mokume Gane Beads to Polymer Clay Tutorials
Go to Home Page
Contribute with YOUR tutorial
My dream is to make this site the largest and best jewelry making site there is. Where you can find tutorials on every aspect of jewelry making, a real tutorial heaven for crafters around the world.
But, I need your help. Adding only my own tutorials will not give my visitors what they seek, so YOUR tutorial is very valuable not only for me, but for all the people visting this site. With your help, I may achieve my dream, to make this a true tutorial heaven.