Online sales are temporarily suspended !!
Contact the seller in advance before paying for the order!
Blue Dragon Back Chain Mail Necklace

Many chain mail patterns have vividly creative names, like the one in this tutorial. It is called Dragon Back, a name that isn’t so out of the blue, as the center ridge of the chain looks a bit like a dragon’s spine.
The pattern looks complicated, but is not so difficult to make. Like most chain mail patterns it may take a while to get it right from the start, but once you are over that bit, it gets easier. It is based on the very easy European 4-1 weave. To get it flexible enough to drape gracefully around the neck, it should be made with rings that have an aspect ratio (AR) of 5.
In this tutorial I have used small anodized aluminum rings, which make the chain mail necklace very light weight. Larger rings and/or other metals will make it heavier and can give it a very exclusive feeling. The chain mail necklace you see at the bottom of the page is made with bronze and brass rings in 16 gauge and 7 mm id. It was on the brink of being too stiff to drape around the neck, so I removed every second center ring from the back of the center part of the necklace, to make it a bit more flexible.
These aluminum rings made a softer and more flexible chain mail necklace, although the AR was equal to the thicker one. So what type of metals you use can affect the AR slightly making it stiffer than it was intended to be. Therefore if you want to make it with larger rings, use a slightly higher AR than 5 to be on the safe side.
The weave is rope like, and will not drape with the center ridge (the spine) outwards. Instead it will hang with the center ridge more or less downwards. You will see what I mean when your chain mail necklace is done. It still is beautiful, and this feature gives it a more intriguing appearance than what it would have given draping differently. It presents itself from three sides, the front or center ridge, the beautiful weave pattern along the side and the back that looks a bit like the underside of a snake.
What you need:
- 20 gauge Dark Purple Anodized aluminum rings with ID=3.97 mm
- 20 gauge Champagne Anodized aluminum rings with ID=3.97 mm
- 3 mm round silver plated beads
- Two chain nose pliers
- Magnetic clasp
If you are a neebie to chain mail, take a look at this information page before you start. It will make things a bit easier for you:
Chain mail - Useful Information To Avoid Frustration
 |
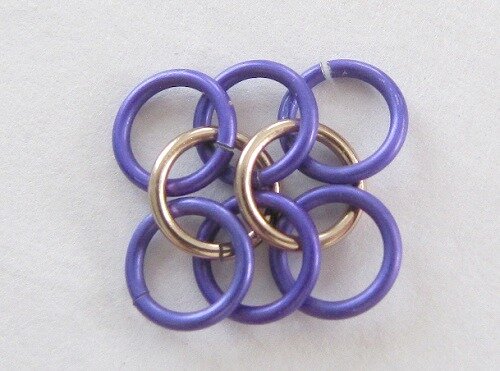
European 4-1:
First you will make a chain in European 4-1. This will be the base of the necklace. Start by closing 4 dark purple rings. Open one Champagne ring and add the four purple rings. Arrange them as you see on the photo. |
 |
Close to purple rings and open one champagne ring. Slide the champagne ring through the last two of the rings you started with. Go up through the bottom one and down through the top one. Add the two purple rings and close the champagne ring. |
 |
Continue like this until it is a bit longer than you want the necklace to be. |
 |
Making the sides:
Add one ring through the two first rings of the European chain. It will go through the first “eye” which is made where two rings from the European chain overlap. |
 |
Slide the next ring through the first ring of the European chain on the outside of the one you previous added, and then through the eye created by the second and third ring. The rings should be lying tilted inward as you see on the photo. Continue adding rings until you reach the end. |
 |
Here you see the first two rings added from another angle. |
 |
And here you see some more added. When you reach the end of the European chain, measure it to check the length. If it is too short, add some more links of European and then the side rings. When the right length is reached you will start the other side. |
 |
Start like you did on the other side, by adding one ring through the eye made from the first and second ring and through the eye created by the second and third rings. Remember to add the new rings on the outer side of the previous one. Continue to the end of the chain. |
 |
Here you see a close up on how they are added. (The added rings are the ones standing up.) |
 |
This is what it looks like with several rings added. |
 |
The dragons back:
When both sides are done, you will do the top/spine of the dragons back. I have added the three first rings without the silver beads, for you to see easier how they are added. Open one champagne ring and add a silver bead. Go through the first eye on the bottom row. Go through the first ring in the European chain, then the second and come up again through the first eye on the top row.
Repeat along the back until you reach the end of the necklace.
|
 |
Here you see a close up. |
 |
And here from the front. I see that I have missed one purple ring on the first champagne ring on the left side, the one marked with an x. The champagne ring should have passed through it, like on the right side. |
 |
Here you see the missed ring where it should be (red cross), and silver beads are added to the first rings. The yellow crosses mark the purple rings the champagne ring goes through. |
 |
And here you can see how the rings go through the eyes (marked red) on each side and through the two rings from the European chain (marked yellow). |
 |
Add the magnetic clasp. |
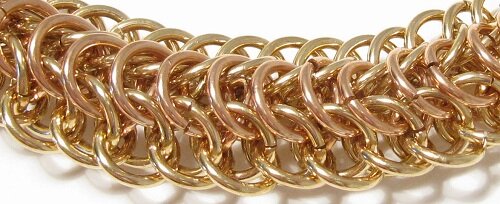
 Here you see the chain mail necklace that is made from larger rings in brass and bronze.
Return from Blue Dragon Back Chain Mail Necklace to Jewelry tutorials
Go to Home Page
Contribute with YOUR tutorial
My dream is to make this site the largest and best jewelry making site there is. Where you can find tutorials on every aspect of jewelry making, a real tutorial heaven for crafters around the world.
But, I need your help. Adding only my own tutorials will not give my visitors what they seek, so YOUR tutorial is very valuable not only for me, but for all the people visting this site. With your help, I may achieve my dream, to make this a true tutorial heaven.