Online sales are temporarily suspended !!
Contact the seller in advance before paying for the order!

Shaving Foam - Not Just For Shaving

Did you know that you could use shaving foam with polymer clay? It sounds kind of weird, does it not? You do of course not shave the beads, but you can use shaving foam to create some pretty nice effects.

I have found that mixing several colors into the same foam, makes the colors look muddy, but if you mix each color separately, and add first one, heat the bead and then the other, the colors mix beautifully. The technique gives you a surface that looks like it is painted with water colors, with the colors floating into each other like in a true aquarelle.

You can use both water based inks and alcohol based inks. In this tutorial I used one of each, and it worked fine with both types. You have only one restriction, and that is that the ink will not show on dark beads. They have to be light. The ones I made in this tutorial are plain white. If you use other light colors, remember that those two colors will blend into a third color. Like blue ink on yellow base will give you a greenish color. You can use that to your advantage, and create some vibrant and beautiful colored beads.

Well, time to start making some beads, here we go:
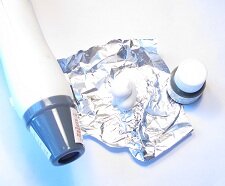
What you need:

  • Polymer clay, White
  • Aluminum foil or paint palette
  • Ink in two colors. I used Eggplant and Sand
  • Bamboo rod
  • Heat gun
  • Bead roller

Step 1:
Condition the clay well. Use the bead roller to shape the beads and stick them onto a thin mandrel or a bamboo rod.
Step 2:
Put some shaving foam onto a piece of foil or in a paint palette. Add one or two drops of ink and stir it loosely. Don’t mix it too well; you want the ink to be spread unevenly with some parts strong and others weak, when applied to the beads. Do the same with the other ink.
Step 3:
Apply the foam onto the beads. Don’t cover them entirely, but add a dash here and there. Heat the bead with the heat gun. This will cause the foam to boil and melt away, leaving only the ink on the bead. Keep adding foam until you are content with the result, and repeat the procedure with the other color.
Step 4:
Cure the beads for 30 minutes. When they are cold, glaze them with liquid polymer clay. This will bring out the lovely colors to their fullest. Since the beads are so small, one coat will be enough to make them nice and shiny. And that was it. Easy, wasn’t it?


You can see these beads used in this tutorial:
Chain Mail Bracelet With Polymer Clay-, Bone- And Freshwater Pearl Charms


Return from Shaving Foam - Not Just For Shaving to Polymer Clay Tutorials

Go to Home Page

Contribute with YOUR tutorial

My dream is to make this site the largest and best jewelry making site there is. Where you can find tutorials on every aspect of jewelry making, a real tutorial heaven for crafters around the world.

But, I need your help. Adding only my own tutorials will not give my visitors what they seek, so YOUR tutorial is very valuable not only for me, but for all the people visting this site. With your help, I may achieve my dream, to make this a true tutorial heaven.

Enter the title of your tutorial here

See tutorials contributed by other visitors

Click below to see tutorials contributed by other visitors.

Use Silver Alcohol Ink Sparingly Not rated yet
I was using this method to make some 'mottled' red and blue beads, intending to add silver splashes here and there. When I had used the dauber technique …

Click here to write your own.